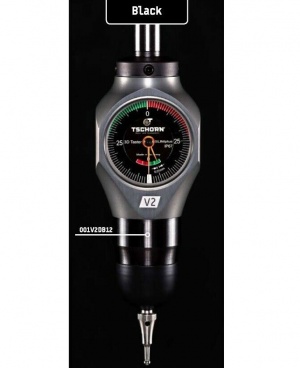
3D Taster
|
Työkoordinaatiston origon määrittämiseen löytyy Tschorn SlimPlus V2 Black joka on omassa BT40-ER32 -pitimessään. Vältä mittalaitteen irroitusta pitimestään, koska irrottamisen jälkeen se pitää kalibroida.
3D Tasterin pituusoffset on määritelty työkalupaikassa 17. Tasteri on sen verran pitkä, että säilytetään koneen ulkopuolella, ei työkalumakasiinissa. 3D Tasterin manuaali löytyy: http://downloads.3dtaster.com/3D_MAN.pdf Opastusvideo: https://youtu.be/F7uMa5q7Q3k 3D Tasterin mittapäitä löytyy: https://www.ebay.co.uk/itm/Tasteinsatz-Standard-D3mm-fur-3D-Kantentaster-Tastspitze-00163D003/401060998912 -- jos rikot, tilaa uusi. 3D Taster löytyy: https://www.ebay.co.uk/itm/3D-SLIMplus-Kantentaster-V2-3D-Taster-Messuhr-Analog-Messtaster-Tschorn/400771477098 -- jos rikot, tilaa uusi. |
To determine the origin of the work coordinate system, you can find the Tschorn SlimPlus V2 Black which is in its own BT40-ER32 holder. Avoid removing the meter from its holder, as it must be calibrated after removal.
The 3D Taster length offset is defined in tool position '17' . The taster is long enough to be stored outside the machine, not in the tool magazine. The 3D Taster manual can be found at: http://downloads.3dtaster.com/3D_MAN.pdf Tutorial video: https://youtu.be/F7uMa5q7Q3k 3D Taster probes can be found at: https://www.ebay.co.uk/itm/Tasteinsatz-Standard-D3mm-fur-3D-Kantentaster-Tastspitze-00163D003/401060998912 - if you break, order a new one. 3D Taster can be found at: https://www.ebay.co.uk/itm/3D-SLIMplus-Kantentaster-V2-3D-Taster-Messuhr-Analog-Messtaster-Tschorn/400771477098 - if you break, order a new one. | |
KäyttöYleistäTasterin mittapäänä on 3mm kovametallipallo joka "kelluu". Tasteri kestää ajaa n. 1,5mm yli kiinteästä esteestä, sen jälkeen katkeaa mittapää (25€) tai hajoaa jotain kalliimpaa. Tasterissa on kaksi viisaria. Pienempi viisari on karkealla asteikolla (-1.5mm -- +1.5mm), isompi viisari on tarkempi (0.01mm asteikko). Kun molemmat viisarit osoittavat nollaa, on karan sijainti koneen kertoma (*ei* ole tarvetta laskea mitään). Taster toimii tarkasti vain lähestyttäessä kappaletta. Eli jos menet nollakohdan yli, niin peruuta reilusti irti kappaleesta ja mittaa uusiksi. Vaihda taster karalle käsin. Käytettäessä tasteria kannattaa laittaa SPINDLE ORIENT päälle, jotta tasteri pysyy luettavassa asennossa. |
UsageGeneralThe taster's probe is a 3mm carbide ball that "floats". The taster takes about 1.5 mm to move over a fixed obstacle, after which the probe breaks (25 €) or something more expensive breaks down. Taster has two hands. The smaller hand is on a coarse scale (-1.5mm to + 1.5mm), the larger hand is more accurate (0.01mm scale). When both hands show zero, the position of the spindle is multiplied by the machine (* there is * no need to calculate anything). Taster only works accurately when approaching a piece. That is, if you go over the zero point, then withdraw well from the piece and measure again. Replace the taster on the spindle by hand. When using the taster, you should turn on SPINDLE ORIENT to keep the taster in a readable position. | |
X- ja Y-akselin paikoitusLähesty kappaletta MPG-moodissa joko X- tai Y-suunnassa niin, että mittapään pallo koskee kappaleeseen ensimmäisenä. Kun pienempi (karkea) viisari alkaa liikkumaan, alat olla lähellä ja kannattaa vaihtaa MPG:n vauhti pienemmäksi. Kun molemmat viisarit osoittavat nollaa, voit ottaa mitattavan koordinaatin (X tai Y) ylös POS-näytöltä konekoordinaateista (machine coordinates). |
X and Y axis positioningIn MPG mode, approach the piece in either the X or Y direction so that the probe ball touches the piece first. As the smaller (rough) hand starts to move, you will start to be close and you should change the speed of the MPG to a lower one. When both hands point to zero, you can pick up the coordinate to be measured (X or Y) on the POS screen from the machine coordinates. | |
Z-akselin paikoitusTarkista, että työkoordinaatiston 06 Z on määritelty nollaksi. Aja kara työkaluineen selvästi irti pöydästä (riippuen aiemmasta työkalusta kara saattaa liikkua alaspäin!) mieluiten pöydän tyhjässä kohdassa (ei työkappaleen/puristimen päällä). Aja AUTO-moodissa ohjelma 0002 (3D TASTER USE). Ohjelma ajaa kotiin, ottaa käyttöön työkoordinaatiston 06 (G59) ja työkalun pituuskompensaation (H17) ja ajaa mittapään 250mm korkeudelle pöydästä. Tämän jälkeen voit vaihtaa takaisin MPG-moodiin ja etsiä haluamasi Z-korkeuden samalla tavalla kuin X/Y-paikoituksessa (molemmat viisarit nollaan niin POS-näytöllä absoluuttinen koordinaatti (absolute coordinate -- EI konekoordinaatti!) kertoo korkeuden pöydästä). |
Z-axis positioningCheck that the work coordinate system '06' Z is set to zero. Move the spindle with its tools clearly off the table (depending on the previous tool, the spindle may move downwards!), Preferably in an empty area of the table (not on the workpiece / press). In AUTO mode, run the program '0002 (3D TASTER USE)' . The program drives home, implements the work coordinate system '06' (G59) and tool length compensation ( 'H17' ) and drives the probe 250mm above the table. You can then switch back to MPG mode and search for the desired Z-height in the same way as in X / Y positioning (both hands to zero so on the POS screen the absolute coordinate ( 'NO machine coordinate!' ) Tells the height from the table ). |
