Ero sivun ”Työkalun asetus (Lotta)” versioiden välillä
Ei muokkausyhteenvetoa |
Ei muokkausyhteenvetoa |
||
| (7 välissä olevaa versiota toisen käyttäjän tekemänä ei näytetä) | |||
| Rivi 5: | Rivi 5: | ||
=Työkalun asetus (Lotta)= | =Työkalun asetus (Lotta)= | ||
| width="500" | | | width="500" | | ||
=Tool setting (Lotta)= | =Tool setting (Lotta)= | ||
| | | | ||
| Rivi 10: | Rivi 11: | ||
|- | |- | ||
| | | | ||
[[File: Panel_Program_Source.jpg | 200px | right]] | |||
| | |||
|- | |||
| | |||
=Työkalujen kanssa operointi= | =Työkalujen kanssa operointi= | ||
Lotan makasiiniin mahtuu 16 työkalua joita voidaan käyttää eri toimenpiteissä. Mikäli työkalua aiotaan käyttää automaattiajolla suoritettavasa ohjelmassa, tai sitä liikutellaan [[MDI-moodi|MDI-moodissa]] annetuilla käskylauseilla, työkalu on kalibroitava ennen käyttöä! Tämä toimenpide on välttämätön! | Lotan makasiiniin mahtuu 16 työkalua joita voidaan käyttää eri toimenpiteissä. Mikäli työkalua aiotaan käyttää automaattiajolla suoritettavasa ohjelmassa, tai sitä liikutellaan [[MDI-moodi|MDI-moodissa]] annetuilla käskylauseilla, työkalu on kalibroitava ennen käyttöä! Tämä toimenpide on välttämätön! | ||
Mikäli käytät työkalua pelkästään manuaaliseen työstöön etkä kalibroi sitä, niin poista työkalu makasiinsta tai karalta käytön jälkeen. Näin seuraava käyttäjä ei vahingossa riko konetta ajamalla kalibroimattomalla työkalulla päin estettä.<br clear=all> | Mikäli käytät työkalua pelkästään manuaaliseen työstöön etkä kalibroi sitä, niin poista työkalu makasiinsta tai karalta käytön jälkeen. Näin seuraava käyttäjä ei vahingossa riko konetta ajamalla kalibroimattomalla työkalulla päin estettä.<br clear=all> | ||
| | | | ||
Operation with tools | =Operation with tools= | ||
Lota's magazine holds 16 tools that can be used in various procedures. If the tool is to be used in an automated program, or is moved with the commands given in [[MDI mode | MDI mode]], the tool must be calibrated before use! This procedure is necessary! | Lota's magazine holds 16 tools that can be used in various procedures. If the tool is to be used in an automated program, or is moved with the commands given in [[MDI mode | MDI mode]], the tool must be calibrated before use! This procedure is necessary! | ||
If you only use the tool for manual machining and do not calibrate it, remove the tool from the magazine or spindle after use. This way, the next user does not accidentally break the machine by driving an obstacle with an uncalibrated tool. <br clear=all> | If you only use the tool for manual machining and do not calibrate it, remove the tool from the magazine or spindle after use. This way, the next user does not accidentally break the machine by driving an obstacle with an uncalibrated tool. <br clear=all> | ||
|- | |||
| | |||
[[File: Panel_Operation.jpg | 400px | right]] | |||
| | |||
[[File: Panel_Magazine.jpg | 200px | left]] | |||
|- | |- | ||
| | | | ||
==Työkalun sijoittaminen makasiiniin== | ==Työkalun sijoittaminen makasiiniin== | ||
Kun [[Käsinajo|käsinajomoodi]], esim. [JOG] on valittuna, voidaan makasiinia ohjata paneelin ylävasemmalla olevista [CW] ja [CCW]-napeista. Painallus askeltaa makasiinia yhden pykälän myötä- tai vastapäivään. HUOM! Älä paina nappia jatkuvasti, vaan kerran ja odota, että makasiini siirtyy yhden pykälän. Vasta sitten paina uudelleen. Muuten makasiinilla on taipumus seota ja tilanteen korjaaminen on hankalaa. | Kun [[Käsinajo|käsinajomoodi]], esim. [JOG] on valittuna, voidaan makasiinia ohjata paneelin ylävasemmalla olevista [CW] ja [CCW]-napeista. Painallus askeltaa makasiinia yhden pykälän myötä- tai vastapäivään. HUOM! Älä paina nappia jatkuvasti, vaan kerran ja odota, että makasiini siirtyy yhden pykälän. Vasta sitten paina uudelleen. Muuten makasiinilla on taipumus seota ja tilanteen korjaaminen on hankalaa. | ||
Kun haluamasi sijoituspaikka näkyy makasiinin etulovessa, voit ottaa tai laittaa työkalun siihen. Laitettaessa ole tarkkana, että pitimen vetolovet osuvat oikein (katso miten muut työkalut on laitettu). Lovet pitää olla eteen/taakse-suunnissa.<br clear=all> | Kun haluamasi sijoituspaikka näkyy makasiinin etulovessa, voit ottaa tai laittaa työkalun siihen. Laitettaessa ole tarkkana, että pitimen vetolovet osuvat oikein (katso miten muut työkalut on laitettu). Lovet pitää olla eteen/taakse-suunnissa.<br clear=all> | ||
| | | | ||
== Placing the tool in the magazine == | == Placing the tool in the magazine == | ||
When [[Manual Run | Manual Run Mode]], such as [JOG], is selected, the magazine can be controlled from the [CW] and [CCW] buttons at the top left of the panel. Pressing moves the magazine one notch clockwise or counterclockwise. NOTE! Do not press the button constantly, but once and wait for the magazine to move one notch. Only then press again. Otherwise, the magazine tends to mix and the situation is difficult to correct. | When [[Manual Run | Manual Run Mode]], such as [JOG], is selected, the magazine can be controlled from the [CW] and [CCW] buttons at the top left of the panel. Pressing moves the magazine one notch clockwise or counterclockwise. NOTE! Do not press the button constantly, but once and wait for the magazine to move one notch. Only then press again. Otherwise, the magazine tends to mix and the situation is difficult to correct. | ||
When the location you want appears on the front door of the magazine, you can take or put the tool in it. When fitting, make sure that the pull holes in the holder fit correctly (see how the other tools are fitted). Notches must be forward / backward. <br clear=all> | When the location you want appears on the front door of the magazine, you can take or put the tool in it. When fitting, make sure that the pull holes in the holder fit correctly (see how the other tools are fitted). Notches must be forward / backward. <br clear=all> | ||
| Rivi 161: | Rivi 169: | ||
|- | |- | ||
| | | | ||
[[File: Disp_WCS_1.jpg | 400px]] | [[File: Disp_WCS_1.jpg | 400px | right]] | ||
| | | | ||
|- | |- | ||
| Rivi 169: | Rivi 177: | ||
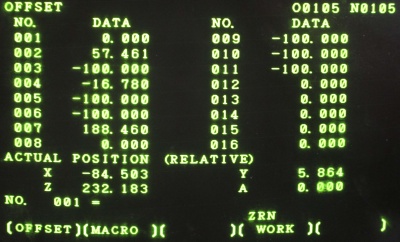
* Siirry näytöllä pari sivua alaspäin [PAGE ↓] kunnes saat työkalujen pituusoffset-taulun näkyviin. Siirry työkalun makasiinipositiota osoittavalle riville, eli siten, että rivi ja makasiinin positionumero ovat samat. Syötä offset etumerkkeineen (jos -) numeronäppäimillä ja sijoita se painamalla [INPUT]. Offsetin pitää nyt näkyä vastaavassa taulkon paikassa. | * Siirry näytöllä pari sivua alaspäin [PAGE ↓] kunnes saat työkalujen pituusoffset-taulun näkyviin. Siirry työkalun makasiinipositiota osoittavalle riville, eli siten, että rivi ja makasiinin positionumero ovat samat. Syötä offset etumerkkeineen (jos -) numeronäppäimillä ja sijoita se painamalla [INPUT]. Offsetin pitää nyt näkyä vastaavassa taulkon paikassa. | ||
: Mikäli laitoit työkalun karalle tilapäisesti ja aiot ottaa sen pois työn lopuksi, käytä offset-taulun paikkoja | : Mikäli laitoit työkalun karalle tilapäisesti ja aiot ottaa sen pois työn lopuksi, käytä offset-taulun paikkoja 18 tai 19. Muista käyttää G-koodissa vastaavaa taulupaikan numeroa xx pituuskompensoinnissa G43 Hxx. HUOM! offset 17 on 3D Tasterin pituuskompensaatio.<br /> | ||
| Rivi 177: | Rivi 185: | ||
* Scroll down a couple of pages [PAGE ↓] until you see the tool length offset table. Navigate to the row showing the magazine position of the tool, ie so that the row and the magazine position number are the same. Enter the offset with the characters (if -) using the number keys and press [INPUT] to place it. The offset should now appear in the corresponding place in the table. | * Scroll down a couple of pages [PAGE ↓] until you see the tool length offset table. Navigate to the row showing the magazine position of the tool, ie so that the row and the magazine position number are the same. Enter the offset with the characters (if -) using the number keys and press [INPUT] to place it. The offset should now appear in the corresponding place in the table. | ||
: If you temporarily placed the tool on the spindle and plan to remove it at the end of the job, use positions | : If you temporarily placed the tool on the spindle and plan to remove it at the end of the job, use positions 18 or 19 on the offset table. Be sure to use the corresponding table location number xx in the G code for length compensation G43 Hxx. NOTE! position 17 is reserved for 3D Taster.<br /> | ||
|- | |- | ||
| | | | ||
[[File: Disp_Offset_1.jpg | 400px | Figure 8]] | [[File: Disp_Offset_1.jpg | 400px | Figure 8 | right]] | ||
| | | | ||
|- | |- | ||
Nykyinen versio 29. huhtikuuta 2021 kello 07.14
Työkalun asetus (Lotta) |
Tool setting (Lotta) |
|
Työkalujen kanssa operointiLotan makasiiniin mahtuu 16 työkalua joita voidaan käyttää eri toimenpiteissä. Mikäli työkalua aiotaan käyttää automaattiajolla suoritettavasa ohjelmassa, tai sitä liikutellaan MDI-moodissa annetuilla käskylauseilla, työkalu on kalibroitava ennen käyttöä! Tämä toimenpide on välttämätön!
Mikäli käytät työkalua pelkästään manuaaliseen työstöön etkä kalibroi sitä, niin poista työkalu makasiinsta tai karalta käytön jälkeen. Näin seuraava käyttäjä ei vahingossa riko konetta ajamalla kalibroimattomalla työkalulla päin estettä. |
Operation with toolsLota's magazine holds 16 tools that can be used in various procedures. If the tool is to be used in an automated program, or is moved with the commands given in MDI mode, the tool must be calibrated before use! This procedure is necessary!
If you only use the tool for manual machining and do not calibrate it, remove the tool from the magazine or spindle after use. This way, the next user does not accidentally break the machine by driving an obstacle with an uncalibrated tool. | |
Työkalun sijoittaminen makasiiniinKun käsinajomoodi, esim. [JOG] on valittuna, voidaan makasiinia ohjata paneelin ylävasemmalla olevista [CW] ja [CCW]-napeista. Painallus askeltaa makasiinia yhden pykälän myötä- tai vastapäivään. HUOM! Älä paina nappia jatkuvasti, vaan kerran ja odota, että makasiini siirtyy yhden pykälän. Vasta sitten paina uudelleen. Muuten makasiinilla on taipumus seota ja tilanteen korjaaminen on hankalaa.
Kun haluamasi sijoituspaikka näkyy makasiinin etulovessa, voit ottaa tai laittaa työkalun siihen. Laitettaessa ole tarkkana, että pitimen vetolovet osuvat oikein (katso miten muut työkalut on laitettu). Lovet pitää olla eteen/taakse-suunnissa. |
Placing the tool in the magazineWhen Manual Run Mode, such as [JOG], is selected, the magazine can be controlled from the [CW] and [CCW] buttons at the top left of the panel. Pressing moves the magazine one notch clockwise or counterclockwise. NOTE! Do not press the button constantly, but once and wait for the magazine to move one notch. Only then press again. Otherwise, the magazine tends to mix and the situation is difficult to correct.
When the location you want appears on the front door of the magazine, you can take or put the tool in it. When fitting, make sure that the pull holes in the holder fit correctly (see how the other tools are fitted). Notches must be forward / backward. | |
Työkalun vaihto makasiinista karalleTyökalu vaihdetaan makasiinista antamalla tarvittavat vaihtokomennot MDI-moodissa kun kara on ensin ajettu kotiasemaan. Vaihto suoritetaan seuraavasti: |
Tool change from magazine to spindleThe tool is changed from the magazine by issuing the necessary change commands in MDI mode when the spindle is first driven to the home position. To switch, follow these steps: | |
|
1. Mikäli paneelissa palaa Z-akselin kotiasemavalo, kara on kotona ja vaihto voidaan suorittaa. Ylensä näin ei ole jolloin toimi näin:
2. Valitse ajotavaksi [MDI], ja näyttöön [PROG].
|
1. If the panel lights up on the Z-axis home station light, the spindle is at home and replacement can be performed. This is usually not the case:
2. Select [MDI] as the drive mode, and display [PROG].
| |
Työkalun vaihto käsin karalleSellainen työkalu joka ei ole makasiinissa, mutta on muuten valmis käytettäväksi, voidaan vaihtaa karalle suoraan lataamatta sitä ensin makasiiniin.
5. Aseta uusi työkalu karan onteloon keskelle, suoraan ja niin syvälle kuin se menee, Mikäli käytät näin vaihdettua työkalua ohjelmassa, sen pituus on kalibroitava kuten alussa on todettu. |
Manual tool change for spindleA tool that is not in the magazine but is otherwise ready for use can be changed directly on the spindle without first loading it into the magazine.
5. Place the new tool in the center of the spindle cavity, straight and as deep as it will go, If you use a tool that has been changed in this program, its length must be calibrated as stated at the beginning. | |
Työkalun pituuden mittausLotalla käytetään ns ”reference tool” -menetelmää jossa referenssityökalun Z-offset pöydän pinnasta on tallennettu työkooridnaatiston 0 (aina voimassa oleva ns EXT-koordinaaatisto) Z-offsetiksi. Kaikkien käytettävien työkalujen pituusoffset ilmoitetaan erotuksena tähän referenssioffsetiin. Pituusoffsetin mittaus työkalulle tapahtuu seuraavasti:
|
Measuring tool lengthLota uses the so-called “reference tool” method, in which the Z-offset of the table of the reference tool is stored as the Z-offset of the work coordinate system 0 (always valid so-called EXT coordinate system). The length offset of all tools used is reported as the difference to this reference offset. The length offset is measured for the tool as follows:
| |
|
| |
|
| |
|
| |
Työkalun pituuden mittaus piipparillaLataa ensin työkalunmittausohjelma muistista. Jos ohjelma O0001 on jo ladattuna, tämän osion voi ohittaa.
|
Measuring tool length with piperFirst, download the tool measurement program from memory. If O0001 is already loaded, you can skip this section.
| |
|
Seuraavaksi mitataan työkalun pituus. Ennen mittausta työkalu pitää vaihtaa ohjelmallisesti karalle M06 koodin avulla, jos sitä ei ole jo tehty. Käynnistyessään kone ei tiedä mikä työkalu on karalla, joten vaihda aina toinen työkalu karalle ennen automaattista mittausta.
|
Next, the tool length is measured. Before measuring, the tool must be changed programmatically on the spindle using code M06, if this has not already been done. When the machine starts, it does not know which tool is on the spindle, so always change another tool on the spindle before the automatic measurement.
|


