Ero sivun ”Työkalun asetus (Lotta)” versioiden välillä
Ei muokkausyhteenvetoa |
Ei muokkausyhteenvetoa |
||
| (30 välissä olevaa versiota 2 käyttäjän tekeminä ei näytetä) | |||
| Rivi 1: | Rivi 1: | ||
__TOC__ | |||
{| style="color:black" | |||
|- | |||
| width="500" | | |||
=Työkalun asetus (Lotta)= | |||
| width="500" | | |||
=Tool setting (Lotta)= | |||
| | |||
|- | |||
| | |||
[[File: Panel_Program_Source.jpg | 200px | right]] | |||
| | |||
|- | |||
| | |||
=Työkalujen kanssa operointi= | =Työkalujen kanssa operointi= | ||
Lotan makasiiniin mahtuu 16 työkalua joita voidaan käyttää eri toimenpiteissä. Mikäli työkalua aiotaan käyttää automaattiajolla suoritettavasa ohjelmassa, tai sitä liikutellaan [[MDI-moodi|MDI-moodissa]] annetuilla käskylauseilla, työkalu on kalibroitava ennen käyttöä! Tämä toimenpide on välttämätön! | Lotan makasiiniin mahtuu 16 työkalua joita voidaan käyttää eri toimenpiteissä. Mikäli työkalua aiotaan käyttää automaattiajolla suoritettavasa ohjelmassa, tai sitä liikutellaan [[MDI-moodi|MDI-moodissa]] annetuilla käskylauseilla, työkalu on kalibroitava ennen käyttöä! Tämä toimenpide on välttämätön! | ||
Mikäli käytät työkalua pelkästään manuaaliseen työstöön etkä kalibroi sitä, niin poista työkalu makasiinsta tai karalta käytön jälkeen. Näin seuraava käyttäjä ei vahingossa riko konetta ajamalla kalibroimattomalla työkalulla päin estettä.<br clear=all> | Mikäli käytät työkalua pelkästään manuaaliseen työstöön etkä kalibroi sitä, niin poista työkalu makasiinsta tai karalta käytön jälkeen. Näin seuraava käyttäjä ei vahingossa riko konetta ajamalla kalibroimattomalla työkalulla päin estettä.<br clear=all> | ||
| | |||
=Operation with tools= | |||
Lota's magazine holds 16 tools that can be used in various procedures. If the tool is to be used in an automated program, or is moved with the commands given in [[MDI mode | MDI mode]], the tool must be calibrated before use! This procedure is necessary! | |||
If you only use the tool for manual machining and do not calibrate it, remove the tool from the magazine or spindle after use. This way, the next user does not accidentally break the machine by driving an obstacle with an uncalibrated tool. <br clear=all> | |||
|- | |||
| | |||
[[File: Panel_Operation.jpg | 400px | right]] | |||
| | |||
[[File: Panel_Magazine.jpg | 200px | left]] | |||
|- | |||
| | |||
==Työkalun sijoittaminen makasiiniin== | ==Työkalun sijoittaminen makasiiniin== | ||
Kun [[Käsinajo|käsinajomoodi]], esim. [JOG] on valittuna, voidaan makasiinia ohjata paneelin ylävasemmalla olevista [CW] ja [CCW]-napeista. Painallus askeltaa makasiinia yhden pykälän myötä- tai vastapäivään. HUOM! Älä paina nappia jatkuvasti, vaan kerran ja odota, että makasiini siirtyy yhden pykälän. Vasta sitten paina uudelleen. Muuten makasiinilla on taipumus seota ja tilanteen korjaaminen on hankalaa. | Kun [[Käsinajo|käsinajomoodi]], esim. [JOG] on valittuna, voidaan makasiinia ohjata paneelin ylävasemmalla olevista [CW] ja [CCW]-napeista. Painallus askeltaa makasiinia yhden pykälän myötä- tai vastapäivään. HUOM! Älä paina nappia jatkuvasti, vaan kerran ja odota, että makasiini siirtyy yhden pykälän. Vasta sitten paina uudelleen. Muuten makasiinilla on taipumus seota ja tilanteen korjaaminen on hankalaa. | ||
Kun haluamasi sijoituspaikka näkyy makasiinin etulovessa, voit ottaa tai laittaa työkalun siihen. Laitettaessa ole tarkkana, että pitimen vetolovet osuvat oikein (katso miten muut työkalut on laitettu). Lovet pitää olla eteen/taakse-suunnissa.<br clear=all> | Kun haluamasi sijoituspaikka näkyy makasiinin etulovessa, voit ottaa tai laittaa työkalun siihen. Laitettaessa ole tarkkana, että pitimen vetolovet osuvat oikein (katso miten muut työkalut on laitettu). Lovet pitää olla eteen/taakse-suunnissa.<br clear=all> | ||
| | |||
== Placing the tool in the magazine == | |||
When [[Manual Run | Manual Run Mode]], such as [JOG], is selected, the magazine can be controlled from the [CW] and [CCW] buttons at the top left of the panel. Pressing moves the magazine one notch clockwise or counterclockwise. NOTE! Do not press the button constantly, but once and wait for the magazine to move one notch. Only then press again. Otherwise, the magazine tends to mix and the situation is difficult to correct. | |||
When the location you want appears on the front door of the magazine, you can take or put the tool in it. When fitting, make sure that the pull holes in the holder fit correctly (see how the other tools are fitted). Notches must be forward / backward. <br clear=all> | |||
|- | |||
| | |||
[[Tiedosto:Panel_Execution.jpg|200px|right]] | |||
[[Tiedosto:Panel_Input.jpg|80px|right]] | |||
| | |||
[[Tiedosto:Panel_Entry.jpg|400px|left]] | |||
|- | |||
| | |||
==Työkalun vaihto makasiinista karalle== | ==Työkalun vaihto makasiinista karalle== | ||
Työkalu vaihdetaan makasiinista antamalla tarvittavat vaihtokomennot MDI-moodissa kun kara on ensin ajettu kotiasemaan. Vaihto suoritetaan seuraavasti:<br /> | Työkalu vaihdetaan makasiinista antamalla tarvittavat vaihtokomennot MDI-moodissa kun kara on ensin ajettu kotiasemaan. Vaihto suoritetaan seuraavasti:<br /> | ||
| | |||
== Tool change from magazine to spindle == | |||
The tool is changed from the magazine by issuing the necessary change commands in MDI mode when the spindle is first driven to the home position. To switch, follow these steps: <br /> | |||
|- | |||
| | |||
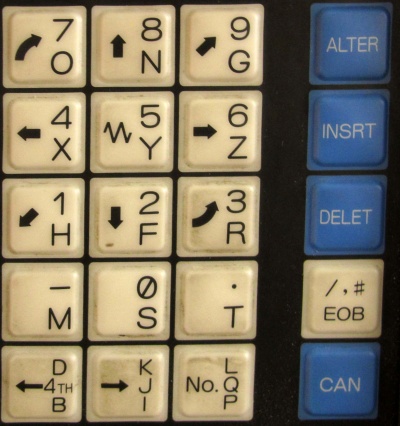
1. Mikäli [[Ohjauspaneeli|paneelissa]] palaa Z-akselin kotiasemavalo, kara on kotona ja vaihto voidaan suorittaa. Ylensä näin ei ole jolloin toimi näin:<br /> | 1. Mikäli [[Ohjauspaneeli|paneelissa]] palaa Z-akselin kotiasemavalo, kara on kotona ja vaihto voidaan suorittaa. Ylensä näin ei ole jolloin toimi näin:<br /> | ||
: a) Tarkista, että kara ei jo ole kotirajan päällä (rajakytkin näkyy karan takana sen oikealla puolella). Jos rajakytkimen vastakappale on lähellä kytkinboksia, niin aja karaa käsinajolla alemmas selvästi irti rajalta.<br /> | : a) Tarkista, että kara ei jo ole kotirajan päällä (rajakytkin näkyy karan takana sen oikealla puolella). Jos rajakytkimen vastakappale on lähellä kytkinboksia, niin aja karaa käsinajolla alemmas selvästi irti rajalta.<br /> | ||
| Rivi 25: | Rivi 62: | ||
: c) [OUTPT START], (käynnistä toiminto)<br /> | : c) [OUTPT START], (käynnistä toiminto)<br /> | ||
<br clear=all> | <br clear=all> | ||
| | |||
1. If the [[Control panel | panel]] lights up on the Z-axis home station light, the spindle is at home and replacement can be performed. This is usually not the case: <br /> | |||
: a) Check that the spindle is not already on the home boundary (the limit switch is displayed on the right side of the spindle). If the counterpart of the limit switch is close to the switch box, then manually move the spindle lower away from the limit by hand. <br /> | |||
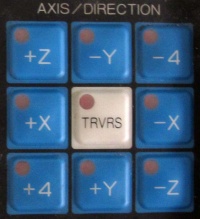
: b) Select [HOME], [+ Z] or [-Z] in the axis selection mode and press [HOME START]. The spindle is now driven to the home position and when the corresponding light comes on you can continue. <br /> | |||
2. Select [MDI] as the drive mode, and display [PROG]. <br /> | |||
3. Use the programming keys to enter the following switching sequence: <br /> | |||
: a) [T] [x] [x] [INPUT], where xx is the number of the desired tool in the magazine (01… 16) <br /> | |||
: b) [M] [0] [6] [INPUT], (actual exchange execution command) <br /> | |||
: c) [OUTPT START], (start function) <br /> | |||
<br clear=all> | |||
|- | |||
| | |||
[[Tiedosto:Spindle_Toolholder_Gap.jpg|80px|right]] | |||
| | |||
[[Tiedosto:Panel_T_UNC.jpg|80px|left]] | |||
|- | |||
| | |||
==Työkalun vaihto käsin karalle== | ==Työkalun vaihto käsin karalle== | ||
Sellainen työkalu joka ei ole makasiinissa, mutta on muuten valmis käytettäväksi, voidaan vaihtaa karalle suoraan lataamatta sitä ensin makasiiniin.<br /> | Sellainen työkalu joka ei ole makasiinissa, mutta on muuten valmis käytettäväksi, voidaan vaihtaa karalle suoraan lataamatta sitä ensin makasiiniin.<br /> | ||
1. Aja Z-akseli käsinajolla sopivalle korkeudelle, jotta yletyt työkaluun kunnolla käsin. Akselin ei tarvitse olla kotiasemassa.<br /> | 1. Aja Z-akseli käsinajolla sopivalle korkeudelle, jotta yletyt työkaluun kunnolla käsin. Akselin ei tarvitse olla kotiasemassa.<br /> | ||
| Rivi 45: | Rivi 98: | ||
Vielä kerran: mikäli et kalibroi työkalua, palauta aiempi työkalu takaisin käytön jälkeen. Makasiiniin tai karalle ei tulisi jättää kalibroimattomia työkaluja koska se on potentiaalinen vaaran paikka. | Vielä kerran: mikäli et kalibroi työkalua, palauta aiempi työkalu takaisin käytön jälkeen. Makasiiniin tai karalle ei tulisi jättää kalibroimattomia työkaluja koska se on potentiaalinen vaaran paikka. | ||
<br clear=all> | <br clear=all> | ||
| | |||
== Manual tool change for spindle == | |||
A tool that is not in the magazine but is otherwise ready for use can be changed directly on the spindle without first loading it into the magazine. <br /> | |||
1. Manually drive the Z axis to a suitable height so that you can reach the tool properly by hand. The shaft does not have to be in the home position. <br /> | |||
2. Select a manual mode, eg [JOG] <br /> | |||
3. See how large the gap is between the tool holder and the face of the spindle (approx. 2 mm) so that you can visually assess whether the new tool is properly seated when you have replaced it. Take a firm grip on the tool arm and then press the [T UNC] button on the left side of the panel. The tool now disengages into your hands (may sometimes require a detach) and you can release the button. When the spindle is empty, you can look for a spindle cavity cleaning tool (red plastic handle with a conical head) on the shelf and screw it through the hole in the spindle so that extra grooves are cleaned from the mating surface <br /> | |||
4. Pick up a new tool, wipe the surface of the cone clean of any excess, and take a proper grip on its shaft. Please note two things: <br /> | |||
:: a) Be careful not to hold the tool so that leather is left between the face of the spindle and the tool holder. You make that mistake only once but better not once. The spindle takes a '' 'STRONG' '' grip on the tool. <br /> | |||
:: b) The slots on the sides of the tool holder must hit the drawbar shoulder blades, otherwise the holder will not reach the destination. So make sure the holder is in the correct position in your hand. <br /> | |||
5. Place the new tool in the center of the spindle cavity, straight and as deep as it will go, <br /> | |||
6. Press and hold the [T UNC] button to unlock, <br /> | |||
7. Press the tool all the way in firmly and hold it down with force, <br /> | |||
8. While pressing the tool, release the [T UNC] button. <br /> | |||
If all went well, the tool now sits on the spindle with a gap of a couple of millimeters between the end face of the spindle and the top surface of the slot groove. If the gap is clearly larger, you did not press hard enough and the tool is not at the bottom. In that case, grab the grip of the tool and the other point 6 forward again, but press harder. Also, make sure that the tool was in the correct position so that the shoulders hit the correct position. <br /> | |||
If you use a tool that has been changed in this program, its length must be calibrated as stated at the beginning. <br /> | |||
Once again: if you do not calibrate the tool, return the previous tool after use. Uncalibrated tools should not be left in the magazine or spindle as it is a potential hazard location. | |||
<br clear=all> | |||
|- | |||
| | |||
|- | |||
| | |||
[[Tiedosto:Panel_Display_Select.jpg|200px|right]] | |||
| | |||
[[Tiedosto:Disp_position.jpg|400px|left]] | |||
|- | |||
| | |||
==Työkalun pituuden mittaus== | ==Työkalun pituuden mittaus== | ||
| Rivi 50: | Rivi 132: | ||
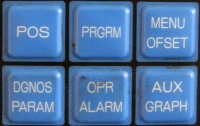
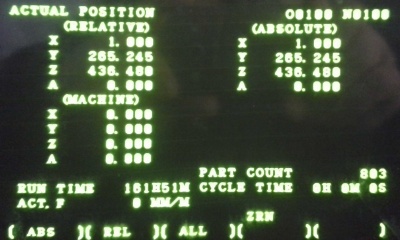
* Valitse näyttöön ACTUAL POSITION [POS] ja näytön alta pehmonäppäimistä [ALL] jotta saat kaikki asemakoordinaattien esitykset näytölle, | * Valitse näyttöön ACTUAL POSITION [POS] ja näytön alta pehmonäppäimistä [ALL] jotta saat kaikki asemakoordinaattien esitykset näytölle, | ||
| | |||
== Measuring tool length == | |||
<br | Lota uses the so-called “reference tool” method, in which the Z-offset of the table of the reference tool is stored as the Z-offset of the work coordinate system 0 (always valid so-called EXT coordinate system). The length offset of all tools used is reported as the difference to this reference offset. The length offset is measured for the tool as follows: <br /> | ||
* Select ACTUAL POSITION [POS] on the screen and [ALL] at the bottom of the screen to display all position coordinate representations, | |||
|- | |||
| | |||
* Ota mitattava työkalu karalle joko makasiinista tai käsin (kts yllä), | * Ota mitattava työkalu karalle joko makasiinista tai käsin (kts yllä), | ||
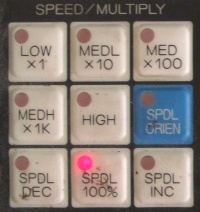
* Aja työkalu käsinajolla [MPG] [+Z] [MED 100] lähelle pöytää sopivaan kohtaan jossa ei ole esteitä ja pöydän pinta on virheetön. Sopiva paikka on esim. lähellä vasenta reunaa melko edessä, | * Aja työkalu käsinajolla [MPG] [+Z] [MED 100] lähelle pöytää sopivaan kohtaan jossa ei ole esteitä ja pöydän pinta on virheetön. Sopiva paikka on esim. lähellä vasenta reunaa melko edessä, | ||
| | |||
* Take the tool to be measured on the spindle either from the magazine or by hand (see above), | |||
* Manually move the tool [MPG] [+ Z] [MED 100] close to the table to a suitable point where there are no obstacles and the surface of the table is flawless. A suitable place is, for example, close to the left edge quite in front, | |||
|- | |||
| | |||
[[File: Panel_Speed_Multiply.jpg | 200px | right]] | |||
| | |||
[[File: Panel_Axis_Direction.jpg | 200px | left ]] | |||
|- | |||
| | |||
* Etsi valkoisesta pahvilaatikosta 5 mm mittapuikko, | * Etsi valkoisesta pahvilaatikosta 5 mm mittapuikko, | ||
* Puikkoa rakotulkkina käyttäen lähesty pöytää kunnes puikko ei enää mahdu kulkemaan terän ali. Varo ajamasta päin puikkoa kun se on terän alla! | * Puikkoa rakotulkkina käyttäen lähesty pöytää kunnes puikko ei enää mahdu kulkemaan terän ali. Varo ajamasta päin puikkoa kun se on terän alla! | ||
| Rivi 64: | Rivi 158: | ||
* (Etsi jostain laskin). Vähennä tästä luvusta puikon paksus 5 mm → -318.752 – 5.000 = -323.752 | * (Etsi jostain laskin). Vähennä tästä luvusta puikon paksus 5 mm → -318.752 – 5.000 = -323.752 | ||
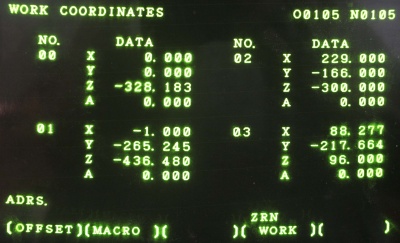
* Valitse näyttö [MENU OFFSET] ja selaa [PAGE ↑], [PAGE ↓] näppäimillä ensimmäiselle WORK COORDINATES -sivulle. Lue koordinatisetin NO.00 (EXT) Z-arvo. Oletetaan esimerkin vuoksi, että arvo on -328.183 | * Valitse näyttö [MENU OFFSET] ja selaa [PAGE ↑], [PAGE ↓] näppäimillä ensimmäiselle WORK COORDINATES -sivulle. Lue koordinatisetin NO.00 (EXT) Z-arvo. Oletetaan esimerkin vuoksi, että arvo on -328.183 | ||
| | |||
* Find a 5 mm dipstick in a white cardboard box, | |||
* Using a stick as a slit interpreter, approach the table until the stick can no longer pass under the blade. Be careful not to drive the stick when it is under the blade! | |||
* Gradually decrease the factor [MED 100] → [MEDL 10] → [LOW 1] until you find the height at which the stick just goes under the blade when you touch it. | |||
* Under MACHINE COORDINATES, read the Z value, which is a negative number. For the example, it is assumed that the reading would be at least -318,752. | |||
* (Find a calculator somewhere). Subtract the needle thickness from this figure by 5 mm → -318,752 - 5,000 = -323,752 | |||
* Select the [MENU OFFSET] screen and use [PAGE ↑], [PAGE ↓] to scroll to the first WORK COORDINATES page. Read the Z value of the coordinate set NO.00 (EXT). For the example, suppose the value is -328,183 | |||
|- | |||
| | |||
[[File: Disp_WCS_1.jpg | 400px | right]] | |||
| | |||
|- | |||
| | |||
* Vähennä mitatusta arvosta (-323.752) talletettu referenssiarvo (-328.183). Käytännössä voit suorittaa laskutoimituksen -323.752 + 328.183 koska - - on sama kuin +. Tässä tuloksena on +4,431. | * Vähennä mitatusta arvosta (-323.752) talletettu referenssiarvo (-328.183). Käytännössä voit suorittaa laskutoimituksen -323.752 + 328.183 koska - - on sama kuin +. Tässä tuloksena on +4,431. | ||
* Tarkista tuloksen järkevyys näppäilyvirheiden varalta. Lotan referenssityökalu on piippari joka löytyy yleensä työpöydän ylähyllyltä. Jos karalla oleva työkalu on lyhyempi kuin piippari, laskennan tuloksen pitää olla | * Tarkista tuloksen järkevyys näppäilyvirheiden varalta. Lotan referenssityökalu on piippari joka löytyy yleensä työpöydän ylähyllyltä. Jos karalla oleva työkalu on lyhyempi kuin piippari, laskennan tuloksen pitää olla negatiivinen ja päinvastoin. Esimerkin työkalu oli siis ~4 mm pidempi. | ||
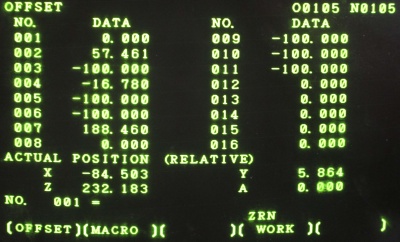
* Siirry näytöllä pari sivua alaspäin [PAGE ↓] kunnes saat työkalujen pituusoffset-taulun näkyviin. Siirry työkalun makasiinipositiota osoittavalle riville, eli siten, että rivi ja makasiinin positionumero ovat samat. Syötä offset etumerkkeineen (jos -) numeronäppäimillä ja sijoita se painamalla [INPUT]. Offsetin pitää nyt näkyä vastaavassa taulkon paikassa. | * Siirry näytöllä pari sivua alaspäin [PAGE ↓] kunnes saat työkalujen pituusoffset-taulun näkyviin. Siirry työkalun makasiinipositiota osoittavalle riville, eli siten, että rivi ja makasiinin positionumero ovat samat. Syötä offset etumerkkeineen (jos -) numeronäppäimillä ja sijoita se painamalla [INPUT]. Offsetin pitää nyt näkyä vastaavassa taulkon paikassa. | ||
Mikäli laitoit työkalun karalle tilapäisesti ja aiot ottaa sen pois työn lopuksi, käytä offset-taulun paikkoja | : Mikäli laitoit työkalun karalle tilapäisesti ja aiot ottaa sen pois työn lopuksi, käytä offset-taulun paikkoja 18 tai 19. Muista käyttää G-koodissa vastaavaa taulupaikan numeroa xx pituuskompensoinnissa G43 Hxx. HUOM! offset 17 on 3D Tasterin pituuskompensaatio.<br /> | ||
<br /> | |||
| | |||
* Subtract the stored reference value (-328,183) from the measured value (-323,752). In practice, you can perform the calculation -323,752 + 328,183 because - - is the same as +. This results in +4.431. | |||
* Check the reasonableness of the result for typing errors. Lotta’s reference tool is a beeper that is usually found on the top shelf of your desk. If the tool on the spindle is shorter than the beeper, the result of the calculation must be negative and vice versa. The tool in the example was thus ~ 4 mm longer. | |||
* Scroll down a couple of pages [PAGE ↓] until you see the tool length offset table. Navigate to the row showing the magazine position of the tool, ie so that the row and the magazine position number are the same. Enter the offset with the characters (if -) using the number keys and press [INPUT] to place it. The offset should now appear in the corresponding place in the table. | |||
: If you temporarily placed the tool on the spindle and plan to remove it at the end of the job, use positions 18 or 19 on the offset table. Be sure to use the corresponding table location number xx in the G code for length compensation G43 Hxx. NOTE! position 17 is reserved for 3D Taster.<br /> | |||
|- | |||
| | |||
[[File: Disp_Offset_1.jpg | 400px | Figure 8 | right]] | |||
| | |||
|- | |||
| | |||
==Työkalun pituuden mittaus piipparilla== | ==Työkalun pituuden mittaus piipparilla== | ||
| Rivi 85: | Rivi 203: | ||
# Syötä ohjelmanumero [0][0][0][1] ja [INPUT], jonka jälkeen [RESET] | # Syötä ohjelmanumero [0][0][0][1] ja [INPUT], jonka jälkeen [RESET] | ||
| | |||
== Measuring tool length with piper == | |||
First, download the tool measurement program from memory. If O0001 is already loaded, you can skip this section. | |||
# Flip the code key horizontally (allows editing programs) | |||
# Select [EDIT] as the operation mode and [PROG] on the screen | |||
# Press the [C.A.P.] soft key and then [SEARCH] | |||
# Enter the program number [0] [0] [0] [1] and [INPUT], followed by [RESET] | |||
|- | |||
| | |||
Seuraavaksi mitataan työkalun pituus. Ennen mittausta työkalu pitää vaihtaa ohjelmallisesti karalle M06 koodin avulla, jos sitä ei ole jo tehty. Käynnistyessään kone ei tiedä mikä työkalu on karalla, joten vaihda aina toinen työkalu karalle ennen automaattista mittausta. | Seuraavaksi mitataan työkalun pituus. Ennen mittausta työkalu pitää vaihtaa ohjelmallisesti karalle M06 koodin avulla, jos sitä ei ole jo tehty. Käynnistyessään kone ei tiedä mikä työkalu on karalla, joten vaihda aina toinen työkalu karalle ennen automaattista mittausta. | ||
| Rivi 95: | Rivi 224: | ||
# Paina [CYCLE START] näppäintä, jonka jälkeen pituus on mitattu | # Paina [CYCLE START] näppäintä, jonka jälkeen pituus on mitattu | ||
# Laita mittari takaisin laatikon viereen ja käännä vipu pois päältä | # Laita mittari takaisin laatikon viereen ja käännä vipu pois päältä | ||
| | |||
Next, the tool length is measured. Before measuring, the tool must be changed programmatically on the spindle using code M06, if this has not already been done. When the machine starts, it does not know which tool is on the spindle, so always change another tool on the spindle before the automatic measurement. | |||
# Place the tool on the spindle | |||
# Manually move the tool [MPG] [+ Z] [MED 100] close to the table to a suitable point where there are no obstacles and the surface of the table is flawless. A suitable place is, for example, close to the left edge quite in front | |||
# Turn the lever on the box on the top of the console | |||
# Place the gauge next to the box (black box with the silver dial) under the tool and press it once (stops beeping) | |||
# Gradually decrease the factor [MED 100] → [MEDL 10] → [LOW 1] until you find the height at which the light on the meter turns on and beeps every step. | |||
# Select [AUTO] as the operation mode and [PROG] on the screen | |||
# Press the [CYCLE START] key, then the length is measured | |||
# Put the meter back next to the box and turn the lever off | |||
|} | |||
<br clear=all> | <br clear=all> | ||
---- | ---- | ||
Nykyinen versio 29. huhtikuuta 2021 kello 07.14
Työkalun asetus (Lotta) |
Tool setting (Lotta) |
|
Työkalujen kanssa operointiLotan makasiiniin mahtuu 16 työkalua joita voidaan käyttää eri toimenpiteissä. Mikäli työkalua aiotaan käyttää automaattiajolla suoritettavasa ohjelmassa, tai sitä liikutellaan MDI-moodissa annetuilla käskylauseilla, työkalu on kalibroitava ennen käyttöä! Tämä toimenpide on välttämätön!
Mikäli käytät työkalua pelkästään manuaaliseen työstöön etkä kalibroi sitä, niin poista työkalu makasiinsta tai karalta käytön jälkeen. Näin seuraava käyttäjä ei vahingossa riko konetta ajamalla kalibroimattomalla työkalulla päin estettä. |
Operation with toolsLota's magazine holds 16 tools that can be used in various procedures. If the tool is to be used in an automated program, or is moved with the commands given in MDI mode, the tool must be calibrated before use! This procedure is necessary!
If you only use the tool for manual machining and do not calibrate it, remove the tool from the magazine or spindle after use. This way, the next user does not accidentally break the machine by driving an obstacle with an uncalibrated tool. | |
Työkalun sijoittaminen makasiiniinKun käsinajomoodi, esim. [JOG] on valittuna, voidaan makasiinia ohjata paneelin ylävasemmalla olevista [CW] ja [CCW]-napeista. Painallus askeltaa makasiinia yhden pykälän myötä- tai vastapäivään. HUOM! Älä paina nappia jatkuvasti, vaan kerran ja odota, että makasiini siirtyy yhden pykälän. Vasta sitten paina uudelleen. Muuten makasiinilla on taipumus seota ja tilanteen korjaaminen on hankalaa.
Kun haluamasi sijoituspaikka näkyy makasiinin etulovessa, voit ottaa tai laittaa työkalun siihen. Laitettaessa ole tarkkana, että pitimen vetolovet osuvat oikein (katso miten muut työkalut on laitettu). Lovet pitää olla eteen/taakse-suunnissa. |
Placing the tool in the magazineWhen Manual Run Mode, such as [JOG], is selected, the magazine can be controlled from the [CW] and [CCW] buttons at the top left of the panel. Pressing moves the magazine one notch clockwise or counterclockwise. NOTE! Do not press the button constantly, but once and wait for the magazine to move one notch. Only then press again. Otherwise, the magazine tends to mix and the situation is difficult to correct.
When the location you want appears on the front door of the magazine, you can take or put the tool in it. When fitting, make sure that the pull holes in the holder fit correctly (see how the other tools are fitted). Notches must be forward / backward. | |
Työkalun vaihto makasiinista karalleTyökalu vaihdetaan makasiinista antamalla tarvittavat vaihtokomennot MDI-moodissa kun kara on ensin ajettu kotiasemaan. Vaihto suoritetaan seuraavasti: |
Tool change from magazine to spindleThe tool is changed from the magazine by issuing the necessary change commands in MDI mode when the spindle is first driven to the home position. To switch, follow these steps: | |
|
1. Mikäli paneelissa palaa Z-akselin kotiasemavalo, kara on kotona ja vaihto voidaan suorittaa. Ylensä näin ei ole jolloin toimi näin:
2. Valitse ajotavaksi [MDI], ja näyttöön [PROG].
|
1. If the panel lights up on the Z-axis home station light, the spindle is at home and replacement can be performed. This is usually not the case:
2. Select [MDI] as the drive mode, and display [PROG].
| |
Työkalun vaihto käsin karalleSellainen työkalu joka ei ole makasiinissa, mutta on muuten valmis käytettäväksi, voidaan vaihtaa karalle suoraan lataamatta sitä ensin makasiiniin.
5. Aseta uusi työkalu karan onteloon keskelle, suoraan ja niin syvälle kuin se menee, Mikäli käytät näin vaihdettua työkalua ohjelmassa, sen pituus on kalibroitava kuten alussa on todettu. |
Manual tool change for spindleA tool that is not in the magazine but is otherwise ready for use can be changed directly on the spindle without first loading it into the magazine.
5. Place the new tool in the center of the spindle cavity, straight and as deep as it will go, If you use a tool that has been changed in this program, its length must be calibrated as stated at the beginning. | |
Työkalun pituuden mittausLotalla käytetään ns ”reference tool” -menetelmää jossa referenssityökalun Z-offset pöydän pinnasta on tallennettu työkooridnaatiston 0 (aina voimassa oleva ns EXT-koordinaaatisto) Z-offsetiksi. Kaikkien käytettävien työkalujen pituusoffset ilmoitetaan erotuksena tähän referenssioffsetiin. Pituusoffsetin mittaus työkalulle tapahtuu seuraavasti:
|
Measuring tool lengthLota uses the so-called “reference tool” method, in which the Z-offset of the table of the reference tool is stored as the Z-offset of the work coordinate system 0 (always valid so-called EXT coordinate system). The length offset of all tools used is reported as the difference to this reference offset. The length offset is measured for the tool as follows:
| |
|
| |
|
| |
|
| |
Työkalun pituuden mittaus piipparillaLataa ensin työkalunmittausohjelma muistista. Jos ohjelma O0001 on jo ladattuna, tämän osion voi ohittaa.
|
Measuring tool length with piperFirst, download the tool measurement program from memory. If O0001 is already loaded, you can skip this section.
| |
|
Seuraavaksi mitataan työkalun pituus. Ennen mittausta työkalu pitää vaihtaa ohjelmallisesti karalle M06 koodin avulla, jos sitä ei ole jo tehty. Käynnistyessään kone ei tiedä mikä työkalu on karalla, joten vaihda aina toinen työkalu karalle ennen automaattista mittausta.
|
Next, the tool length is measured. Before measuring, the tool must be changed programmatically on the spindle using code M06, if this has not already been done. When the machine starts, it does not know which tool is on the spindle, so always change another tool on the spindle before the automatic measurement.
|


