Mendel90
The Mendel 90 is the pink printer which can print various materials, like PLA, ABS etc. During winter 2017-2018 more powerful PSU was installed and thicker wires were put to the hot end to prevent voltage loss.

Printer can be found at http://mendel90.local Login / Password is mendel90 / hacklab. Click "Connect" once logged in.
Printing instructions:
- Generated G-Code with a slicer software (for example Slic3r or Cura, instructions below)
- Log in
- Click Upload-button to push your G-Code to Octoprint
- Click load (open file button) in the file list
- Check your G-Code in GCode viewer (use bar on right to see different layers)
- Hit Print-button
Sisällysluettelo
Maintenance TODO
- Tidy up wiring, especially the heavy duty cable going to the print head
- Change print head's cooling fan and fix its mounting
- Install part cooling fan
- Fix led lights
Printing With CURA
Here are instructions on how to use Cura with Mendel90. These instructions are for version 2.7.0
Create new profile for the printer.
- Settings -> Printer -> Add printer...
- Click "Other" and select Mendel90. Click "Add printer"
- Settings -> Printer -> Manage printers...
- Open Machine settings, check "Origin at center" and change Material diameter to 2.85mm. Other default settings are fine.
Slice a model.
- Open model file (usually .stl) to Cura.
- If necessary, model can be moved, rotated or scaled using tool icons on left side. Click the model first.
- Select correct material and desired print quality level from top right.
- Choose infill and enable supports if needed
- Build plate adhesion should be selected
- Settings can be tuned further from Custom setup
- Estimated print time and filament consumption are visible at bottom part of the screen.
- Save G-code to a file and upload it to Octoprint.
Here are settings for printing with older versions of CURA slicer.
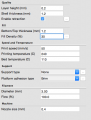
Cura PrintSettings
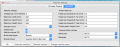
Cura Machine Settings

Printing with Slic3r
You can find Slic3r settings that have produced decent print results here. You might want to check out "Infill", "Skirt and Brim" and "Support Material" settings under "Print Settings". These might not be available until you enable Advanced mode from Slic3r main Preferences (Slic3r -> Preferences in Os X).
- Provided settings have 40% infill and honeycomb pattern. This can be changed from "Print Settings" -> "Infill"
- Provided settings have only 5mm brimm. This can be changed from "Print Settings" -> "Skirt and Brimm"
- By default Slic3r doesn't create support material bridges, this can be enabled by unchecking "Don't support bridges" under "Print Settings" -> "Support Material". It is recommended to check the resulting g-code from "Plater" -> "Layers", Slic3r may produce support structures that are difficult to remove.
- Slic3r UI settings for temperatures don't seem to do anything, if you want to change them go to "Printer Settings" -> "Custom G-Code" and change the numbers on the lines that say "M190 S110" and "M109 S230".
- Mendel90 has a habit of creating too tall objects. For example one print came out about 125% height while other measures were pretty close to intended. You might be able to compensate by scaling height of your object to 80%. If you find a good solution for this, please write it here or update the settings.
Changing filament
- Move print head away from bed surface if needed using manual controls in "Control" tab at Octoprint
- From Temperature tab, set the hot end to recommended temperature of the current filament. Wait for the hot end to heat up.
- At Control tab select 10mm for extruder movement. Click "Retract" and at the same time gently pull the filament. Repeat until filament is released from the printing head.
- If new filament's type is different, set hot end's temperature to new filament's recommended value and wait for the hot end to reach new temperature.
- Insert new filament to print head, push it in while clicking "Extrude". Repeat until the feeder grabs the filament.
- Keep clicking "Extrude" until material starts to come out from the print head. Change movement to 1mm and continue extruding until all of the old material has come out and the new material coming out is clean.
Adjusting bed height
Bed height might need adjusting if the printer has been moved, after maintenance work or if a lot of force has been applied to bed for example when removing badly stuck part from the bed. If bed height is incorrect, the first layer does not adhere properly to the bed and in extreme case the nozzle might scrape the glass surface.
Tools:
- 3mm(?) allen key, preferably with long stem and ball head.
- 6mm(?) spanner
- Piece of ordinary printing paper
- Precise round object with known thickness, for example 5mm drill bit
Procedure:
- In Octoprint go to "Control" tab. Drive all axes to home.
- Carefully drive Z axis to the height of the adjustment tool. If height is badly off, there is a change of crashing nozzle to the glass so be careful. At first manual controls in Control tab can be used to move the Z axis, but when getting nearer to the bed, select "Absolute" mode and go to Terminal tab. Check "Suppress M115 messages". Current height value can be read by typing "M114" command. Move Z axis to correct height with "G1" command. For example "G1 Z5 F200" drives Z axis to 5mm. If bad misalignment is suspected approach the height gradually and use slow speed, for example F100.
- Using manual controls, move print head to the first corner of the bed so that the nozzle is near the edge but still well above the glass. Front left is the easiest corner to start from.
- Put piece of paper on the glass under the nozzle and roll the measurement tool under the nozzle. Height setting is correct if the tool fits under the nozzle barely touching it. The bed is a bit wobbly so be careful not to ruin the measurement by pressing the bed with hand.
- If there is a gap or the tool does not fit, loosen nyloc nut at the bottom of the bed while holding the screw with allen key. Adjust the height by turning the screw with allen key while holding the nut between washer and bottom plate with a spanner. Gently squeeze the glass and the bottom plate together (to remove any slack) while being careful not to affect the bed height and check the height with the tool. Keep adjusting until the tool fits snugly between the paper and the nozzle. Tighten the nyloc nut while holding the screw with allen key. Once more check the height with the tool.
- Repeat the procedure for all four corners.
- If there is not enough room to get the height correct by moving the nuts, the firmware must be recompled. Set nuts of one corner to "middle value", drive Z axis to home and measure the distance between the nozzle and the bed surface. In Configuration.h there is a setting called Z_HEIGHT_MM. Correct the value, recompile the firmware and upload it to the controller.
The Marlin Firmware can be found on (TechnomadicJim) github: https://github.com/morrisonj/Marlin