Ero sivun ”Ultraäänipesuri” versioiden välillä
Siirry navigaatioon
Siirry hakuun
Ei muokkausyhteenvetoa |
|||
| (25 välissä olevaa versiota 3 käyttäjän tekeminä ei näytetä) | |||
| Rivi 1: | Rivi 1: | ||
__TOC__ | |||
{| style="color:black" | |||
|- | |||
| width="500" | | |||
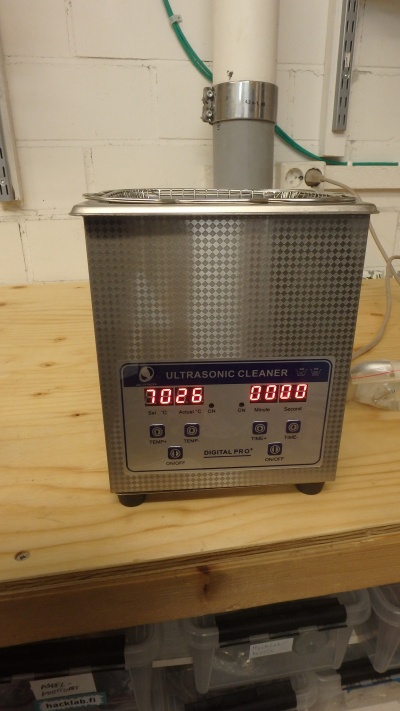
[[Tiedosto:Ultrasonic cleaner.jpg|400px|oikea|pienoiskuva|Ultrasonic cleaner]] | |||
| width="500" | | |||
'''' | |||
| | |||
|- | |||
| | |||
Ultraäänipuhdistimen käyttö: | |||
# Täytä astia nesteellä, vesijohtovesi on yleensä tarpeeksi hyvää | |||
# Valinnaisesti lisää pieni määrä astianpesunestettä veteen | |||
# Kytke virtakytkin laitteen takaosaan | |||
# Vaihtoehtoisesti kytke laitteen lämmitin päälle ohjauspaneelin vasemmalta puolelta | |||
# Aseta puhdistettavat osat metallikoriin ja laske tarvittaessa nesteeseen, laita pienet kumiosat korin ja astian väliin melun välttämiseksi. | |||
# Kytke ultraäänilähetin päälle ohjauspaneelin oikealla puolella | |||
# * Suurin jatkuva puhdistusaika 15 minuuttia, sitten 3 minuutin tauko | |||
# Odota | |||
# * Parhaan tuloksen saavuttamiseksi on suositeltavaa kääntää korin osat viiden minuutin välein. | |||
# Poista osat | |||
# Sammuta laite | |||
# Poista neste | |||
# Puhdista puhdistusaine | |||
Pienempien osien puhdistamiseksi voit sijoittaa ne pieneen muoviastiaan, jossa on ohut seinät, kuten kertakäyttöinen muovimuki. Täytä sitten puhdistusaine vedellä ja muki millä tahansa tarvittavalla puhdistusnesteellä ja aseta se veteen. Tällä tavalla et likaista puhdistajaa. | |||
== Linkit == | |||
https://www.finnsonic.com/ | |||
| | |||
Using the ultrasonic cleaner: | Using the ultrasonic cleaner: | ||
# Fill the vessel with liquid, tap water is generally good enough | # Fill the vessel with liquid, tap water is generally good enough | ||
| Rivi 6: | Rivi 39: | ||
# Turn the power switch on at the rear of the unit | # Turn the power switch on at the rear of the unit | ||
# Optionally turn on the heater of the unit, left side of the control panel | # Optionally turn on the heater of the unit, left side of the control panel | ||
# Place parts to be cleaned on the metal basket and lower into the liquid | # Place parts to be cleaned on the metal basket and lower into the liquid, if needed, put small rubber-parts between basket and vessel to avoid noise. | ||
# Turn on the ultrasonic emitter, right side of the control panel | # Turn on the ultrasonic emitter, right side of the control panel | ||
#* Maximum continuous cleaning time 15 minutes, then 3 minutes break | # * Maximum continuous cleaning time 15 minutes, then 3 minutes break | ||
# Wait | # Wait | ||
#* For best results it is advisable to turn over the parts in the basket at fiveish minute intervals. | # * For best results it is advisable to turn over the parts in the basket at fiveish minute intervals. | ||
# Remove parts | # Remove parts | ||
# Turn off the unit | # Turn off the unit | ||
| Rivi 18: | Rivi 51: | ||
For cleaning smaller parts you can place them in a small plastic container with thin walls, like a disposable plastic mug. Then fill the cleaner with water and the mug with whatever cleaning liquid you need and place in the water. This way you don't soil the cleaner. | For cleaning smaller parts you can place them in a small plastic container with thin walls, like a disposable plastic mug. Then fill the cleaner with water and the mug with whatever cleaning liquid you need and place in the water. This way you don't soil the cleaner. | ||
==Links== | |||
https://www.finnsonic.com/ | |||
|- | |||
| | |||
== Isompi ultraäänipesuri == | |||
| | |||
== The Great Ultrsound Washer == | |||
|} | |||
<gallery> | |||
Tiedosto: Ultrasonic cleaner 2.jpg|Pieni esine muoviastiassa/Small object in plastic container | |||
</gallery> | |||
[[Luokka:Laitteet]] | |||
Nykyinen versio 12. huhtikuuta 2021 kello 21.55
|
' |
||
|
Ultraäänipuhdistimen käyttö:
Pienempien osien puhdistamiseksi voit sijoittaa ne pieneen muoviastiaan, jossa on ohut seinät, kuten kertakäyttöinen muovimuki. Täytä sitten puhdistusaine vedellä ja muki millä tahansa tarvittavalla puhdistusnesteellä ja aseta se veteen. Tällä tavalla et likaista puhdistajaa.
Linkit |
Using the ultrasonic cleaner:
For cleaning smaller parts you can place them in a small plastic container with thin walls, like a disposable plastic mug. Then fill the cleaner with water and the mug with whatever cleaning liquid you need and place in the water. This way you don't soil the cleaner. Links | |
Isompi ultraäänipesuri |
The Great Ultrsound Washer |

