Helsinki Hacklabin wikistä
Siirry navigaatioon
Siirry hakuun
|
|
|
|
Tarran syöttäminen koneeseen
YOUTUBE Operation Instructional Video [US English] : https://www.youtube.com/watch?v=cW0aie8mvGw
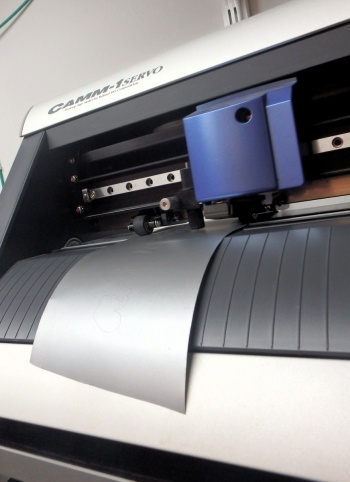
- Leikkurin takaa löytyy teline, johon saa aseteltua rullalle pyöritetyn tarran
- Leikkurissa on kaksi rullaa, jotka lasketaan alas vasemmalta takaa löytyvästä vivusta
- Rullia liikutetaan sormin, kun vipu on laskettu alas
- Rullien etäisyys toisistaan ilmaisee koneelle, kuinka leveä tarra on
- Molempien rullien on sijaittava valkoisella merkityillä alueilla
- Lisäksi tarran on liikuttava siten, että se ylittää valoportit edessä ja takana
- Nosta vipu ylös, kun rullat ovat paikallaan (rullat laskeutuvat)
- Kapeiden tarramateriaalien kanssa molemmat rullat saattavat olla samalla vasemman laidan valkoisella alueella
- Valitse joko roll tai piece, riippuen siitä, onko kyseessä rullamateriaali (pituus määrittelemätön) vai irtopala (valinta tehdään ylös-alas-napeilla)
- Jos valitset rullalle irtopalan, kone pyrkii mittaamaan koko rullan pituuden ajamalla sen syötön läpi kokonaan!
- Kone ilmaisee nyt tarran leveyden, tai lisäksi pituuden, jos kyseessä on palatarra
- Marginaalia tarraan syntyy rullan leveyden verran, jos rulla on kokonaisuudessaan tarran päällä (reunassa kiinni ulkolaidasta)
|
Inserting a Label into the Machine
YOUTUBE Operation Instructional Video [US English]: https://www.youtube.com/watch?v=cW0aie8mvGw
- Behind the mower there is a stand where you can place a sticker rolled on a roll
- The mower has two rollers that are lowered from the lever on the left rear
- The rollers are moved with your fingers when the lever is lowered
- The distance between the rollers indicates to the machine how wide the label is
- Both rollers must be located in the areas marked in white
- In addition, the label must move so that it crosses the light gates at the front and back
- Raise the lever when the rollers are in place (rollers lower)
- With narrow label materials, both rollers may be in the same white area on the left edge
- Select either roll or piece, depending on whether it is a roll material (length unspecified) or a loose piece (selection is made with the up-down buttons)
- If you select a loose piece for the roll, the machine will try to measure the entire length of the roll by driving it completely through the feed!
- The machine now indicates the width of the label, or in addition the length if it is a piece label
- A margin on the label is created by the width of the roll if the roll is completely on the label (attached to the outer edge at the edge)
|
Ohjelmisto
Ohjelma CutStudio löytyy leikkurin koneelta. Pystyy lukemaan sisään tiedostoja:
Rasterikuvat:
Lataa rasterikuva (import bmp/jpg) ja valitse Object > image outlines. Nyt kuva on vektoroitu (lopputulos voi olla kehno).
Alareunassa lukee lopputuloksen koko.
Kun tarra on ladattu, niin mittasuhteet dokumentille saa leikkurilta:
- File > Cutting > Properties > Get from machine
Tietojen lähetys leikkurille
Tarraleikkurin ohjelmistossa on mahdollista hakea koneeseen ladatun tarran mitat dokumentin pohjaksi.
|
Software
CutStudio can be found on the cutter machine. Able to read files:
Raster images:
Download the raster image (import bmp / jpg) and choose Object> image outlines. Now the image is vectorized (the end result can be poor).
The size of the final result is read at the bottom.
Once the label is loaded, the dimensions of the document can be obtained from the cutter:
- File> Cutting> Properties> Get from machine
Sending data to the mower
In the label cutter software, it is possible to retrieve the dimensions of the label loaded on the machine as the basis of the document.
|
Jälkityö ja lopettelu
- Leikkurista: Menu-nappi > Unsetup (Enter)
- Nosta rullat ylös
- Leikkaa tarra rullasta, jos ei ole palatarra
- Sammutus virtanappia pitkään painamalla
- Tee tarrallesi siirtotarra
Tarran siirto pintaan
- Irroita leikatusta tarrasta ei-halutut alueet esim. pinseteillä ja veitsen kärjellä
- Paina tarran yläpintaan sopivan kokoinen siirtotarra, paina vaikka lastalla tai viivottimella pois ilma tarran pinnan ja siirtotarran välistä
- Irroita tarran alapinnan valkoinen kerros vasta siirtotarran kiinnittämisen jälkeen
- Puhdista kohdepinta hyvin pölystä ja rasvasta puhdistusaineella
- Paina tarra kohdepintaan siirtotarran avulla käyttäen lastaa tai viivotinta
- Spraymaali ja vinyylitarra eivät sovellu hyvin yhteen: stensiliksi kannattaa valita esim. rullalta löytyvä harmaanvihreä läpinäkyvä kalvo tms.
|
Follow-up and termination
- From the Cutter: Menu Button> Unsetup (Enter)
- Lift the rollers up
- Cut the sticker from the roll if there is no piece sticker
- Press and hold the power button to turn off
- Make a transfer sticker for your sticker
Label transfer to the surface
- Remove unwanted areas from the cut sticker, eg with tweezers and a knife tip
- Press a transfer label of a suitable size on the top of the label, even with a spatula or ruler to remove air between the label surface and the transfer label
- Do not remove the white layer from the bottom of the label until you have affixed the transfer label
- Thoroughly clean the target surface of dust and grease with a cleaning agent
- Press the label onto the target surface using the transfer label using a spatula or ruler
- Spray paint and vinyl sticker do not go well together: it is advisable to choose a gray-green transparent film, etc. found on the roll, as the stencil.
|
