Ero sivun ”Metallisorvi” versioiden välillä

Helsinki Hacklabin wikistä
Siirry navigaatioon Siirry hakuun
Rivi 153: Rivi 153:
 
[[Tiedosto:TOS_SN40_2.png|Sorvi]]
 
[[Tiedosto:TOS_SN40_2.png|Sorvi]]
  
Kuva 1: Sorvin käyttökytkimet ja -vivut
+
Kuva 2: Sorvin käyttökytkimet ja -vivut
  
Figure 1: Operating switches and levers of the lathe
+
Figure 2: Operating switches and levers of the lathe
  
  
Rivi 163: Rivi 163:
  
 
=== Koneen Käyttö ===
 
=== Koneen Käyttö ===
 +
Kts Kuva 2.
 +
  
 
==== Aloitus ====
 
==== Aloitus ====
Rivi 179: Rivi 181:
 
* Käynnistä moottori painamalla vihreää nappia (6)
 
* Käynnistä moottori painamalla vihreää nappia (6)
 
* Vedä käyttövipua (7) oikealle jolloin lukko vapautuu ja sitten alas ja kara (a) alkaa pyörimään eteenpäin, tai ylös niin taaksepäin. Älä käytä käyttövipua nopeudensäätimenä vaan siirrä se aina pohjaan asti ja myös palauta keskelle, muuten poltat kytkinlevyt (vrt auton kytkin).
 
* Vedä käyttövipua (7) oikealle jolloin lukko vapautuu ja sitten alas ja kara (a) alkaa pyörimään eteenpäin, tai ylös niin taaksepäin. Älä käytä käyttövipua nopeudensäätimenä vaan siirrä se aina pohjaan asti ja myös palauta keskelle, muuten poltat kytkinlevyt (vrt auton kytkin).
* Työstä kappaletta joko käsipyörillä tai konesyötöllä (8). Konesyötöllä '''VARO AJAMASTA PÄIN PYÖRIVÄÄ PAKKAA''' tai mitään muutakaan. Sorvi ei itse varo mitään joten sinun on se tehtävä! Konesyötön vipu vaatii jonkin verran voimaa, joten harjoittele ennen kuin menet ahtaisiin paikkoihin!
+
* Työstä kappaletta joko käsipyörillä tai konesyötöllä (8). Konesyötöllä '''VARO AJAMASTA PÄIN PYÖRIVÄÄ PAKKAA''' tai mitään muutakaan. Sorvi ei itse varo mitään joten sinun on se tehtävä - älä nuku ratissa! Konesyötön vipu vaatii jonkin verran voimaa, joten harjoittele ennen kuin menet ahtaisiin paikkoihin!
 
* Pysäytä kara vetämällä kytkin takaisin keskiasentoon, jossa se asettuu lukituskoloon. Huomaa, että pakan täydellinen pysäyttäminen usein vaatii hienosäätöä käyttövivulla jotta löytyy kohta jossa jarru pitää pakan paikallaan.
 
* Pysäytä kara vetämällä kytkin takaisin keskiasentoon, jossa se asettuu lukituskoloon. Huomaa, että pakan täydellinen pysäyttäminen usein vaatii hienosäätöä käyttövivulla jotta löytyy kohta jossa jarru pitää pakan paikallaan.
 
* Sammuta moottori punaisesta napista (9) tai hätätapauksessa painikkeesta (10).
 
* Sammuta moottori punaisesta napista (9) tai hätätapauksessa painikkeesta (10).
Rivi 190: Rivi 192:
 
||
 
||
 
=== Operating the Machine===
 
=== Operating the Machine===
 +
See figure 2.
 +
  
 
==== Before turning ====
 
==== Before turning ====
 
* Switch on the main breaker (1)
 
* Switch on the main breaker (1)
* Fasten the workpiece to the chuck
+
* Fasten the workpiece to the chuck (a)
 
* Slide the chuck protector forward
 
* Slide the chuck protector forward
 
* set the chuck speed from the gearbox
 
* set the chuck speed from the gearbox
** high vs low gear is selected by lever (2) at the top of the gearbox. Make sure that the lever is either fully left or fully right to engage properly.
+
** high vs low gear is selected by lever (2a) at the top of the gearbox. Make sure that the lever is either fully left or fully right to engage properly.
** The gear ratio is set by the right hand double levers (3)
+
** The gear ratio is set by the right hand double levers (2b)
 
* Set automatic feed speed
 
* Set automatic feed speed
** select gear ratio (4)
+
** select gear ratio (3). NOTE: At this time only ratio 1:1 as in the figure, is functional
** select coarse speed (5)
+
** select coarse speed (4a)
** select fine speed from the gear shift lever (6)
+
** select fine speed from the gear shift lever (4b)
* ensure that threading mode is not engaged by setting the threading selector lever (7) in the middle position
+
* ensure that threading mode is not engaged by setting the threading selector lever (5b) in the middle position and check that the thread engagement lever (5c) in the carriage is disengaged position up.
 
==== Turning ====
 
==== Turning ====
* To start the motor press green button (8)
+
* To start the motor press green button (6)
* Push operating lever to the right to disengage latch. Then down for forward or up for reverse. DON'T use the lever as a speed control device or you will burn the clutch plates. Always depress fully and return fully.
+
* Push operating lever (7) to the right to disengage latch. Then down for forward or up for reverse. DON'T use the lever as a speed control device or you will burn the clutch plates. Always depress fully and return fully.
* Do the turning
+
* Do the turning either by manually operating the handwheels or by using machine feed lever (8). When machine feeding '''TAKE CARE NOT TO COLLIDE THE CARRIAGE WITH THE ROTATING CHUCK''' or anything else either. The lathe will not guard against anything so it is your responsibility to do so - don't sleep at the wheel! Also note that the machine feed lever will take some force to operate, so familiarize with it before going into tight places.
* Stop chuck by returning the lever to middle position where it latches to the locking notch. Note that to completely stop the chuck you may need to fiddle with the operating lever abit to find the point where the clutches are open and the brake engages.
+
* Stop chuck by returning the lever (7) to middle position where it latches to the locking notch. Note that to completely stop the chuck you may need to fiddle with the operating lever a bit to find the point where the clutches are open and the brake engages.
* Press the red button to stop the drive motor.
+
* Press the red button (9)to stop the drive motor, or in an emergency, button (10).
  
 
==== Finishing working ====
 
==== Finishing working ====

Versio 16. lokakuuta 2019 kello 11.54


TOS SN40 -sorvi

Vuonna 2016 hankittu legendaarinen tsekkiläinen TOS SN40 -sorvi.

Samoin kuin Lotta-jyrsin tämä toistaiseksi erisnimeä vailla oleva sorvi on niitä kaluja joiden käyttöön vaaditaan perehtymistä ja näyttöä asioiden hallinnasta.

TOS SN40 lathe

In 2016 we acquired a legendary Czech TOS SN40 lathe.

Same as Lotta mill this so far unnamed lathe is one of the tools that require familiarization and demonstartion of know-how to operate it.

Turvallisuus

Yleisesti: koneistuksessa tulee noudattaa aina yhtä ja määrättyä prioriteettijärjestystä:

  • TURVALLISUUS ENSIN
  • TARKKUUS TOISENA
  • NOPEUS VIIMEISENÄ

Onnettomuudet sorvin kanssa työskennellessä tapahtuvat yleensä siten, että:

  1. Pakka-avain on unohtunut pakan silmään ja lentää sorvarin otsaan kun kone käynnistetään
  2. Löysä vaatetus tarttuu pyörivään pakkaan tai työkappaleeseen karmaisevin seurauksin
  3. Irtoava lastu lentää silmään
  4. Huonosti kiinnitetty työkappale irtoaa ja ruhjoo käyttäjän
  5. Pakka, työkappale tai kärkisorvauksen vetokoukku osuu käsille
  • Pukeudu lyhythihaiseen paitaan tai kääri hihat!
  • Riisu kello, sormukset ja kaikenlaiset roikkuvat korut jotka voivat tarttua liikkuviin kappaleisiin!
  • Käytä suojalaseja tai kasvomaskia aina liikkuessasi pyörivän sorvin lähellä!
  • Noudata kunnollisia työkappaleen kiinnitysperiatteita!
  • Älä IKINÄ yritä pysäyttää sorvia käsivoimin!
  • PUHELU KULJETTAJAN KANSSA KIELLETTY! Sorvin käyttö vaatii keskittymistä.
kun sorvaat, niin sorvaa! Käy kaikki keskustelut sorvi pysäytettynä!
  • Ole tarkkaan selvillä kuinka sorvi pysäytetään mahdollisimman nopeasti hätätilanteessa.
  • Ole tietoinen mitä sorvin ympärillä tapahtuu ja on tapahtumassa!
  • Pidä sorvin edusta siistinä ja vapaana esteistä joihin voi kaatua!
  • Leikkuunestettä käytettäessä huolehdi, että se valuu kaukaloon eikä sitä roisku lattialle!
Roiskeet aiheuttavat liukastumisvaaran ja käyttäjä tai joku muu voi kaatua päin pyörivää sorvia!
Samasta syystä on käyttäjän vastuulla siivota roiskeet välittömästi pois, olipa ne aiheuttanut kuka tahansa.
  • Älä kouki lastuja paljain käsin koska ne voivat leikata ilkeästi, eikä missään tapauksessa sorvin pyöriessä!
Lastut poistetaan pihdeillä tai lastukoukulla.
Opettele hallitsemaan lastunmuodostus jotta vältät ylipitkien lastujen kiertymisen työkappaleen ja pakan ympärille.
  • Ole tarkasti selvillä työkalun sijainnista mitatessasi ja asettaessasi sorvia.
Ennen käynnistämistä varmista etteivät terä ja työkappale törmää!

( Kopioitu täältä: https://discourse.hacklab.fi/t/helsingin-labille-jareaa-tyostokalustoa/475/11 23.3.2018)


Safety

In general, when operating machinery there is a definitive order of priorities:

  • SAFETY FIRST
  • ACCURACY SECOND
  • SPEED LAST

Accidents in lathe operation are usually caused by one or more of the following:

  1. The chuck key was left in the chuck and flies at the operator's face when starting the machine
  2. Loose clothing is grabbed by a rotating chuck or workpiece with gruesome results
  3. A chip flies into the operator's eye
  4. A badly attached workpiece flies loose and mutilates the operator
  5. The chuck, workpiece or dog (check it out) strikes the operator's hands
  • Wear short sleeves or roll them up!
  • Remove a wristwatch, rings and all manner of dangling jewelry that might get caught in moving things!
  • Wear goggles or a face mask when moving close to the spinning lathe!
  • Observe the proper ways to fix a workpiece.
  • NEVER attempt to stop the lathe by manual force!
  • DISTRACTING THE DRIVER IS FORBIDDEN! Operating the full manual lathe requires focused attention.
when you operate the lathe, operate the lathe. Shoot the breeze when the machine is standing still!
  • Always know how to quickly stop the lathe in an emergency.
  • Be aware what is going on around the lathe - what is about to go on!
  • Keep the front of the lathe clear of obstacles that might trip someone!
  • When using coolant or cutting fluid make sure it goes into the pan instead of splattering on the floor!
Splatter causes a slipping risk and the operator or a bystander might fall against a rotating lathe!
For the same reason it is the operator's responsibility to clean up all messes, regardless of who caused them.
  • Don't grab chips with your bare hands! They cause mean cuts and definitely don't do this while the machine is turning!
Remove chips using pliers or the chip hook.
Learn how to control chip formation so as to avoid producing overly long chips that tangle around the chuck and workpiece.
  • Always be aware of the position of the cutting tool when setting up the lathe.
Before starting, make sure the tool won't hit the workpiece or chuck!

Sorvi

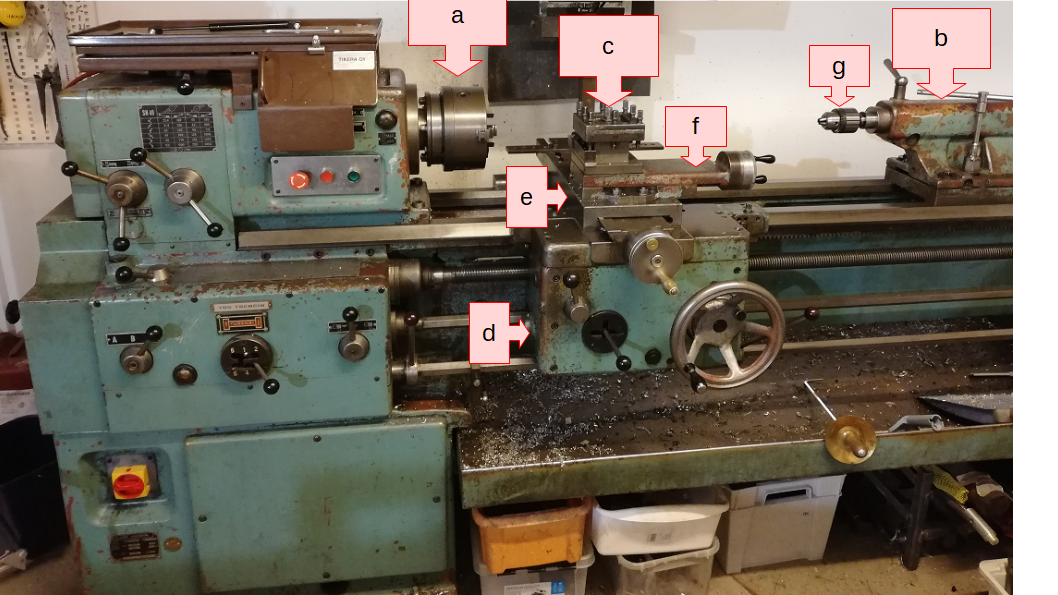
Kuva 1: Sorvin osat

Figure 1: Parts of the lathe

Sorvin osat

Kts Kuva 1.

a: Pakka johon työkappale kiinnitetään. Noudata varovaisuutta ja hyviä työtapoja jottei työkappale muutu ammukseksi huonon kiinnityksen takia! Sorviin löytyy kuvassa näkyvä kolmileukapakka sekä haastavampiin töihin iso nelileukapakka. Pakka kiinnittyy sen takana näkyvillä 4:llä pultilla. Pakkaa vaihtaessa suojaa johteet ja varaudu, että nelileukapakka on painava.

b: Kärkipylkkä joka liukuu johteiden päällä ja voidaan lukita paikalleen. Käytetään työkappaleen tukemiseen kiinteillä tai pyörivillä kärjillä, sekä keskiöreikien poraamiseen. Kärkipylkässä on veivipyörällä liikkuva ja lukittava pinoli jolla kärjen tukeminen tai poraus suoritetaan.

c: Työkalun kiinnitystorni johon varsinainen sorvausterä kiinnitetään. Kuvassa näkyy alkuperäinen malli, se korvautuu Multifix-pikakiinnikkeellä.

d: Pitkittäinen teräkelkka

e: poikitainen teräkelkka

f: huippukelkka eli kompoundi

g: Kärkipylkän kärki (tai kuvassa keskiöreiän porapakka)

Parts of the lathe

See Figure 1.

a: The chuck where you attach the workpiece. Be careful and observe proper work methods to prevent the workpiece from becoming a projectile due to incompetent fixing! The lathe has the 3 jaw chuck visible in the figure as well as a 4 jaw chuck for more demanding jobs. The chuck is fixed with the 4 bolts visible in Fig 1. When switching chucks do protect the ways and take note that the 4 jaw chuck is heavy.

b: Tail stock that slides on the ways and can be locked in place. It is used to support the workpiece with rotating or stationary centers, and for drilling the center holes. The tail stock has a hand wheel operated quill to facilitate drilling and the quill can be locked to fix the center supporting the workpiece.

c: Tool post for fixing the actual cutting tools. The figure shows the original 4-way tool post which will be replaced by a Multifix quick change tool post.

d: The longitudinal slide

e: The cross-slide

f: Top slide or compound

g: tail stock center or, in this picture, the drill chuck for center drilling

Sorvi

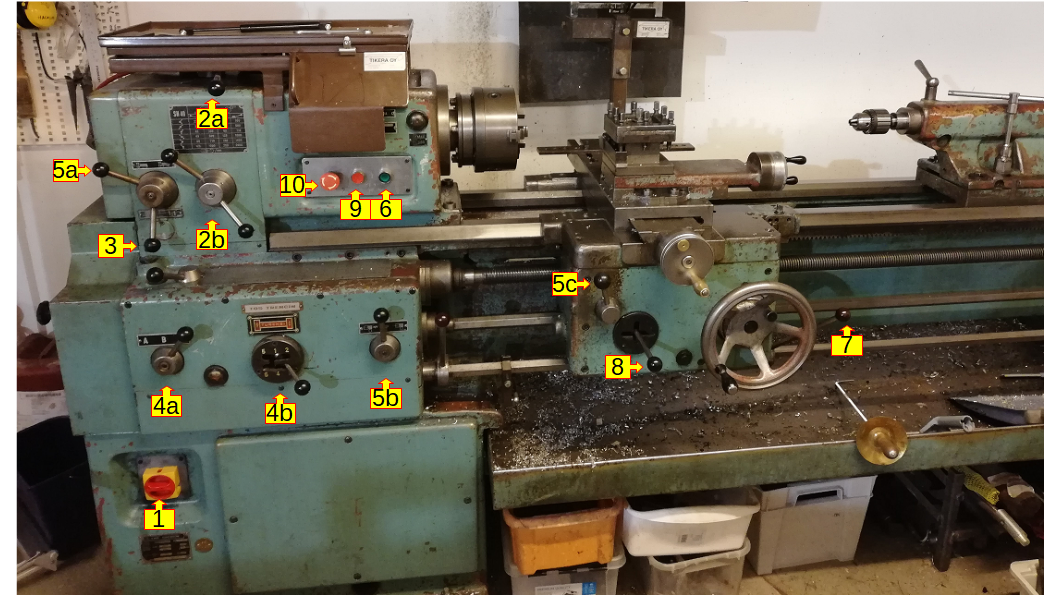
Kuva 2: Sorvin käyttökytkimet ja -vivut

Figure 2: Operating switches and levers of the lathe


Koneen Käyttö

Kts Kuva 2.


Aloitus

  • Käännä sähköt päälle päävirtakytkimestä (1)
  • Kiinnitä työkappale pakkaan (a)
  • Vedä karasuoja karan päälle
  • Aseta karan nopeus vaihteistosta
    • Ison ja pienen välityksen vaihto tapahtuu laitteen päällä olevasta vivusta (2a): Tarkista, että tämä vipu on asetettu ääriasentoon joko oikealle tai vasemmalle
    • Vaihde valitaan oikenpuoleisilla kaksoisvivuilla (2b)
  • Asetetaan automaattisyötön nopeus
    • Valitaan vaihteiston suhde (3). HUOM: Tällä hetkellä vain asento 1:1 kuten kuvassa!
    • Valitaan konesyötön karkea nopeus (4a)
    • Valitaan konesyötön nopeuden hienosäätö vaihdekepistä (4b)
  • Varmista, että kierteytystoiminto ei ole käytössä siirtämällä kierteytysvipu keskiasentoon (5b) sekä kelkan lukitus auki, vipu (5c) yläasennossa.

Työstö

  • Käynnistä moottori painamalla vihreää nappia (6)
  • Vedä käyttövipua (7) oikealle jolloin lukko vapautuu ja sitten alas ja kara (a) alkaa pyörimään eteenpäin, tai ylös niin taaksepäin. Älä käytä käyttövipua nopeudensäätimenä vaan siirrä se aina pohjaan asti ja myös palauta keskelle, muuten poltat kytkinlevyt (vrt auton kytkin).
  • Työstä kappaletta joko käsipyörillä tai konesyötöllä (8). Konesyötöllä VARO AJAMASTA PÄIN PYÖRIVÄÄ PAKKAA tai mitään muutakaan. Sorvi ei itse varo mitään joten sinun on se tehtävä - älä nuku ratissa! Konesyötön vipu vaatii jonkin verran voimaa, joten harjoittele ennen kuin menet ahtaisiin paikkoihin!
  • Pysäytä kara vetämällä kytkin takaisin keskiasentoon, jossa se asettuu lukituskoloon. Huomaa, että pakan täydellinen pysäyttäminen usein vaatii hienosäätöä käyttövivulla jotta löytyy kohta jossa jarru pitää pakan paikallaan.
  • Sammuta moottori punaisesta napista (9) tai hätätapauksessa painikkeesta (10).

Lopetus

  • Irroita työkappale
  • Siivoa lastut koneen päältä lastualtaaseen. Ajoittain putsaa allas ja kerää lastut pois vieressä olevaan ämpäriin.
  • Sammuta sähköt päävirtakytkimestä (1)

Operating the Machine

See figure 2.


Before turning

  • Switch on the main breaker (1)
  • Fasten the workpiece to the chuck (a)
  • Slide the chuck protector forward
  • set the chuck speed from the gearbox
    • high vs low gear is selected by lever (2a) at the top of the gearbox. Make sure that the lever is either fully left or fully right to engage properly.
    • The gear ratio is set by the right hand double levers (2b)
  • Set automatic feed speed
    • select gear ratio (3). NOTE: At this time only ratio 1:1 as in the figure, is functional
    • select coarse speed (4a)
    • select fine speed from the gear shift lever (4b)
  • ensure that threading mode is not engaged by setting the threading selector lever (5b) in the middle position and check that the thread engagement lever (5c) in the carriage is disengaged position up.

Turning

  • To start the motor press green button (6)
  • Push operating lever (7) to the right to disengage latch. Then down for forward or up for reverse. DON'T use the lever as a speed control device or you will burn the clutch plates. Always depress fully and return fully.
  • Do the turning either by manually operating the handwheels or by using machine feed lever (8). When machine feeding TAKE CARE NOT TO COLLIDE THE CARRIAGE WITH THE ROTATING CHUCK or anything else either. The lathe will not guard against anything so it is your responsibility to do so - don't sleep at the wheel! Also note that the machine feed lever will take some force to operate, so familiarize with it before going into tight places.
  • Stop chuck by returning the lever (7) to middle position where it latches to the locking notch. Note that to completely stop the chuck you may need to fiddle with the operating lever a bit to find the point where the clutches are open and the brake engages.
  • Press the red button (9)to stop the drive motor, or in an emergency, button (10).

Finishing working

  • Remove the workpiece
  • Clean the chips by brushing them down to the chip tray. Periodically clear the tray and move the chips to the chip buckets for removal.
  • Turn the main breaker (1) off.

Sallitut materiaalit

  • Kaikki metallit ilman erityisiä rajoituksia. Huomioi kuitenkin seuraavat tekijät:
  1. Käytettävät työkalun (terän, insertin tms) tulee soveltua kyseisen materiaalin työstöön.
  2. Karkaistujen työkaluterästen sorvaus ei lähtökohtaisesti ole ehkä kaikkein paras idea. Sorvi ei välitä, mutta työkalut ehkä kyllä. Joka tapauksessa suoritus on haasteellisempi.
  3. Pehmeiden materiaalien kuten kuparin sorvaaminen on taitolaji ja vaatii tarkkaan oikeat työkalut.
  • Kaikki muovit ilman erityisiä rajoituksia. Jälleen, huomioi että muovien työstettävyydessä on merkittäviä eroja. Akryylit säröytyvät ja sirpaloituvat herkästi, joten suojaudu KUNNOLLA. Monet muut muovit sulavat syöpaineesta ja tukkivat terät. Muovien kimmomoduli on matala joten pitkän hoikan kappaleen sovaaminen on vaikeaa jne.
  • Puun, lasikuidun ja hiilikuidun sorvaaminen on kielletty samoista syistä kuin Lotallakin. Puutyöhuoneessa on oikea puusorvi jota käytetään puulle. Hiili- ja lasikuidun työstöä ei suositella.

Permitted materials

  • All metals without specific restrictions. However, note the following:
  1. the tool or insert used must be suitable for the workpiece material.
  2. Turning hardened tool steel may not be the best of ideas. The lathe won't mind but your tools may. Anyway it is a more challenging operation.
  3. Turning soft materials such as copper requires skills and the exact right tools.
  • All plastics without specific restrictions are allowed. However, be aware that there are significant differences in workability of various plastics. Acrylics will shatter with ease so do wear proper eye and hand protection! MAny other plastics will melt and deform under tool pressure. Plastics have a low elastic modulus making turning a thin long workpiece a difficult task.
  • Turning wood, glass fiber or carbon fiber is NOT allowed for the same reasons as with Lotta. There is a proper wood lathe in the woodworking room for turning wood. Machining glass and carbon fiber is not recommended.