Ero sivun ”RuuviTag” versioiden välillä
(Ak: Uusi sivu: == RuuviTag == Helsinki Hacklab has a set of the [https://ruuvitag.com/ RuuviTag] open source Bluetooth sensor beacons donated by Ruuvi Innovations. === Quickstart Guide === Start...) |
Ei muokkausyhteenvetoa |
||
| (24 välissä olevaa versiota 3 käyttäjän tekeminä ei näytetä) | |||
| Rivi 1: | Rivi 1: | ||
== RuuviTag == | __TOC__ | ||
{| style="color:black" | |||
|- | |||
| width="500" | | |||
''Left column Finnish!'' | |||
| width="500" | | |||
''Right column English'' | |||
| | |||
|- | |||
| | |||
= RuuviTag = | |||
Helsinki Hacklabilla on joukko [https://ruuvitag.com/ RuuviTag] Ruuvi Innovationsin lahjoittamia avoimen lähdekoodin Bluetooth-sensoreita. | |||
== Pikaopas == | |||
Tämä on pikakäynnistysopas Espruino Javascript -tulkin asentamisesta RuuviTagille. | |||
=== RuuviTagin valmistelu === | |||
Vie kotelo auki kynsillä tai ruuvimeisselillä. Saumassa on pieni sisennys, joka helpottaa sitä. | |||
| | |||
= RuuviTag = | |||
Helsinki Hacklab has a set of the [https://ruuvitag.com/ RuuviTag] open source Bluetooth sensor beacons donated by Ruuvi Innovations. | Helsinki Hacklab has a set of the [https://ruuvitag.com/ RuuviTag] open source Bluetooth sensor beacons donated by Ruuvi Innovations. | ||
== Quickstart Guide == | |||
This is a quickstart guide on how to install the Espruino Javascript interpreter for RuuviTag. | |||
=== Preparing the RuuviTag === | |||
Use your fingernails or a screwdriver to pry the case open. There's a small indentation in the seam that makes it easier. | |||
|} | |||
{| style="color:black" | |||
|- | |||
| width="1000" | | |||
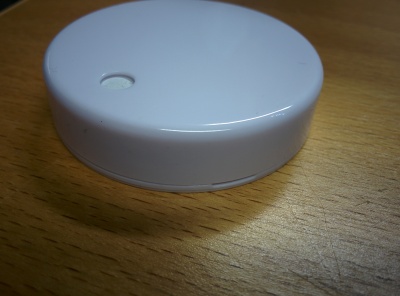
[[Tiedosto: RuuviTag Side.jpeg | 400px | Sivunäkymä RuuviTag|Side view of RuuviTag]] | |||
|} | |||
{| style="color:black" | |||
|- | |||
| width="500" | | |||
| width="500" | | |||
| | |||
|- | |||
| | |||
Poista muovikappale, joka erottaa akun napoista. Varmista, että akku on täysin kosketuksessa napoihin. | |||
RuuviTagin pitäisi nyt toimia. | |||
Punaisen ledin olisi pitänyt syttyä hetkeksi, kun muovinauha poistetaan. | |||
=== RuuviTagin toiminnan testaaminen === | |||
Testaa RuuviTag-toiminnon käyttäminen uudella älypuhelimella, jossa Bluetooth- ja paikannuspalvelut ovat päällä ja nRF Connect- tai nRF Toolkit -sovellus asennettuna. Laite näkyy fyysisenä Web Beacon -laitteena. | |||
Oletuksena RuuviTag lähettää sääsovelluksen osoitteen, joten puhelimesi pitäisi saada ilmoitus käytettävissä olevasta Bluetooth-majakasta. Voit avata ilmoituksen nähdäksesi oletusohjelman, joka näyttää majakan anturitiedot. | |||
| | |||
Remove the piece of plastic that separates the battery from the terminals. Make sure the battery is fully in contact with the terminals. | |||
The RuuviTag should now work. | |||
A red led should have turned on for a while when the plastic strip is removed. | |||
=== Testing That RuuviTag Works === | |||
To test that the RuuviTag works, use a new-ish smartphone with Bluetooth and location services turned on and the nRF Connect or nRF Toolkit app installed. The device show show up as a Physical Web Beacon device. | |||
By default, the RuuviTag broadcasts a weather app address so your phone should receive a notification about an available Bluetooth beacon. You can open the notification to see the default app that shows the sensor information of the beacon. | |||
|} | |||
{| style="color:black" | |||
|- | |||
| width="1000" | | |||
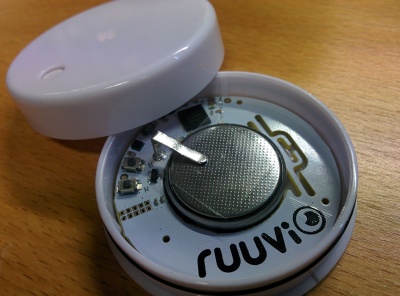
[[Tiedosto: RuuviTag Battery.jpg | 400px | RuuviTag-sivunäkymä]] | |||
|} | |||
{| style="color:black" | |||
|- | |||
| width="500" | | |||
| width="500" | | |||
| | |||
|- | |||
| | |||
=== Espruinon asentaminen === | |||
[https://lab.ruuvi.com/dfu/ Virallinen laiteohjelmistopäivitys] -sivulla on linkki [http://www.espruino.com/binaries/travis/master/espruino_1v92.62_ruuvitag.zip Espruino zip]. Lataa se puhelimeesi / muuhun Bluetooth-laitteeseen. | |||
Seuraava vaihe on RuuviTag-käynnistyslataimen valmistelu. | |||
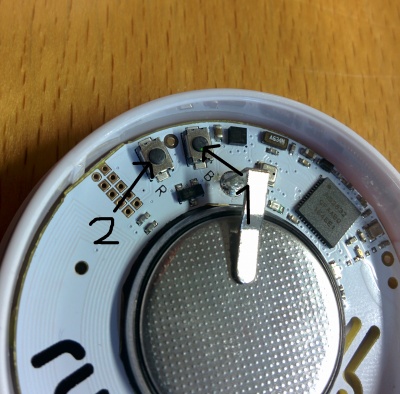
* Pidä B-painiketta painettuna | |||
* Paina R-painiketta | |||
* Vapauta B-painike | |||
Punainen valo syttyy ja pysyy päällä. Kun RuuviTag on valmis lataamista varten, sinun pitäisi nähdä RuuviBoot-laite ilmestyvän nRF Connect -palveluun. Paina DFU-kuvaketta, valitse zip-pakettivaihtoehto ja valitse lataamasi Espruino-zip. Odota, että lataus on valmis | |||
| | |||
=== Installing Espruino === | |||
[https://lab.ruuvi.com/dfu/ The official Firmware Update] page has a link to the [http://www.espruino.com/binaries/travis/master/espruino_1v92.62_ruuvitag.zip Espruino zip]. Download it on your phone/other Bluetooth equipped device. | |||
Next step is to prepare RuuviTag bootloader. | |||
* Press and hold the B button | |||
* Press the R button | |||
* Release B button | |||
The red light should turn on and stay on. After the RuuviTag is ready for uploading, you should see a RuuviBoot device show up on nRF Connect. Press the DFU icon, select the zip package option and select the Espruino zip you downloaded. Wait for the upload to complete. | |||
|} | |||
{| style="color:black" | |||
|- | |||
| width="1000" | | |||
[[Tiedosto: RuuviTag Buttons.jpg | 400px | RuuviTag-painikkeet/Buttons on the RuuviTag]] | |||
|} | |||
{| style="color:black" | |||
|- | |||
| width="500" | | |||
| width="500" | | |||
| | |||
|- | |||
| | |||
=== Espruino Web IDE: n käyttö === | |||
Lataa Espruino Web IDE Chrome App Storesta ja käynnistä sovellus. Napsauta Yhdistä-kuvaketta ruudun vasemmassa yläkulmassa. | |||
Jos RuuviTag ei ole näkyvissä, kokeile ottaa kokeelliset Web-alustan ominaisuudet käyttöön <code> chrome: // flags / </code> -sivulta. | |||
==== Espruinon käyttö Linuxissa ==== | |||
Lue [http://www.espruino.com/Web+Bluetooth+On+Linux this page], jos käytät Espruinoa Ubuntussa etkä saa sitä toimimaan. | |||
| | |||
=== Using Espruino Web IDE === | |||
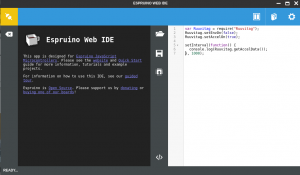
Download the Espruino Web IDE from the Chrome App Store and launch the app. Click on the Connect icon in the top left corner of the screen. | |||
If the RuuviTag is not visible, try enabling Experimental Web Platform features from the <code>chrome://flags/</code> page. | |||
==== Using Espruino on Linux ==== | |||
Read [http://www.espruino.com/Web+Bluetooth+On+Linux this page] if you are using Espruino on Ubuntu and can't get it to work. | |||
|} | |||
{| style="color:black" | |||
|- | |||
| width="1000" | | |||
[[Tiedosto: EspruinoWebIDE.png | 300px | left | pienoiskuva | Espruino Web IDE]] | |||
|} | |||
<gallery> | |||
Tiedosto:NRF Connect RuuviBoot.png|nRF Connect - Scanning For Devices | |||
Tiedosto:NRF Connect DFU.png|nRF Connect - DFU | |||
Tiedosto:NRF Connect Uploading.png|nRF Connect - Uploading | |||
</gallery> | |||
[[Luokka:Laitteet]] | |||
[[ | |||
Nykyinen versio 12. huhtikuuta 2021 kello 22.14
|
Left column Finnish! |
Right column English |
|
RuuviTagHelsinki Hacklabilla on joukko RuuviTag Ruuvi Innovationsin lahjoittamia avoimen lähdekoodin Bluetooth-sensoreita. PikaopasTämä on pikakäynnistysopas Espruino Javascript -tulkin asentamisesta RuuviTagille. RuuviTagin valmisteluVie kotelo auki kynsillä tai ruuvimeisselillä. Saumassa on pieni sisennys, joka helpottaa sitä. |
RuuviTagHelsinki Hacklab has a set of the RuuviTag open source Bluetooth sensor beacons donated by Ruuvi Innovations. Quickstart GuideThis is a quickstart guide on how to install the Espruino Javascript interpreter for RuuviTag. Preparing the RuuviTagUse your fingernails or a screwdriver to pry the case open. There's a small indentation in the seam that makes it easier. |
|
Poista muovikappale, joka erottaa akun napoista. Varmista, että akku on täysin kosketuksessa napoihin. RuuviTagin pitäisi nyt toimia. Punaisen ledin olisi pitänyt syttyä hetkeksi, kun muovinauha poistetaan. RuuviTagin toiminnan testaaminenTestaa RuuviTag-toiminnon käyttäminen uudella älypuhelimella, jossa Bluetooth- ja paikannuspalvelut ovat päällä ja nRF Connect- tai nRF Toolkit -sovellus asennettuna. Laite näkyy fyysisenä Web Beacon -laitteena. Oletuksena RuuviTag lähettää sääsovelluksen osoitteen, joten puhelimesi pitäisi saada ilmoitus käytettävissä olevasta Bluetooth-majakasta. Voit avata ilmoituksen nähdäksesi oletusohjelman, joka näyttää majakan anturitiedot. |
Remove the piece of plastic that separates the battery from the terminals. Make sure the battery is fully in contact with the terminals. The RuuviTag should now work. A red led should have turned on for a while when the plastic strip is removed. Testing That RuuviTag WorksTo test that the RuuviTag works, use a new-ish smartphone with Bluetooth and location services turned on and the nRF Connect or nRF Toolkit app installed. The device show show up as a Physical Web Beacon device. By default, the RuuviTag broadcasts a weather app address so your phone should receive a notification about an available Bluetooth beacon. You can open the notification to see the default app that shows the sensor information of the beacon. |
Espruinon asentaminenVirallinen laiteohjelmistopäivitys -sivulla on linkki Espruino zip. Lataa se puhelimeesi / muuhun Bluetooth-laitteeseen. Seuraava vaihe on RuuviTag-käynnistyslataimen valmistelu.
Punainen valo syttyy ja pysyy päällä. Kun RuuviTag on valmis lataamista varten, sinun pitäisi nähdä RuuviBoot-laite ilmestyvän nRF Connect -palveluun. Paina DFU-kuvaketta, valitse zip-pakettivaihtoehto ja valitse lataamasi Espruino-zip. Odota, että lataus on valmis |
Installing EspruinoThe official Firmware Update page has a link to the Espruino zip. Download it on your phone/other Bluetooth equipped device. Next step is to prepare RuuviTag bootloader.
The red light should turn on and stay on. After the RuuviTag is ready for uploading, you should see a RuuviBoot device show up on nRF Connect. Press the DFU icon, select the zip package option and select the Espruino zip you downloaded. Wait for the upload to complete. |
Espruino Web IDE: n käyttöLataa Espruino Web IDE Chrome App Storesta ja käynnistä sovellus. Napsauta Yhdistä-kuvaketta ruudun vasemmassa yläkulmassa. Jos RuuviTag ei ole näkyvissä, kokeile ottaa kokeelliset Web-alustan ominaisuudet käyttöön Espruinon käyttö LinuxissaLue this page, jos käytät Espruinoa Ubuntussa etkä saa sitä toimimaan. |
Using Espruino Web IDEDownload the Espruino Web IDE from the Chrome App Store and launch the app. Click on the Connect icon in the top left corner of the screen. If the RuuviTag is not visible, try enabling Experimental Web Platform features from the Using Espruino on LinuxRead this page if you are using Espruino on Ubuntu and can't get it to work. |


