Ero sivun ”Metallisorvi” versioiden välillä
Ei muokkausyhteenvetoa |
Ei muokkausyhteenvetoa |
||
| Rivi 153: | Rivi 153: | ||
[[Tiedosto:TOS_SN40_2.png|Sorvi]] | [[Tiedosto:TOS_SN40_2.png|Sorvi]] | ||
Kuva | Kuva 2: Sorvin käyttökytkimet ja -vivut | ||
Figure | Figure 2: Operating switches and levers of the lathe | ||
| Rivi 163: | Rivi 163: | ||
=== Koneen Käyttö === | === Koneen Käyttö === | ||
Kts Kuva 2. | |||
==== Aloitus ==== | ==== Aloitus ==== | ||
| Rivi 179: | Rivi 181: | ||
* Käynnistä moottori painamalla vihreää nappia (6) | * Käynnistä moottori painamalla vihreää nappia (6) | ||
* Vedä käyttövipua (7) oikealle jolloin lukko vapautuu ja sitten alas ja kara (a) alkaa pyörimään eteenpäin, tai ylös niin taaksepäin. Älä käytä käyttövipua nopeudensäätimenä vaan siirrä se aina pohjaan asti ja myös palauta keskelle, muuten poltat kytkinlevyt (vrt auton kytkin). | * Vedä käyttövipua (7) oikealle jolloin lukko vapautuu ja sitten alas ja kara (a) alkaa pyörimään eteenpäin, tai ylös niin taaksepäin. Älä käytä käyttövipua nopeudensäätimenä vaan siirrä se aina pohjaan asti ja myös palauta keskelle, muuten poltat kytkinlevyt (vrt auton kytkin). | ||
* Työstä kappaletta joko käsipyörillä tai konesyötöllä (8). Konesyötöllä '''VARO AJAMASTA PÄIN PYÖRIVÄÄ PAKKAA''' tai mitään muutakaan. Sorvi ei itse varo mitään joten sinun on se tehtävä! Konesyötön vipu vaatii jonkin verran voimaa, joten harjoittele ennen kuin menet ahtaisiin paikkoihin! | * Työstä kappaletta joko käsipyörillä tai konesyötöllä (8). Konesyötöllä '''VARO AJAMASTA PÄIN PYÖRIVÄÄ PAKKAA''' tai mitään muutakaan. Sorvi ei itse varo mitään joten sinun on se tehtävä - älä nuku ratissa! Konesyötön vipu vaatii jonkin verran voimaa, joten harjoittele ennen kuin menet ahtaisiin paikkoihin! | ||
* Pysäytä kara vetämällä kytkin takaisin keskiasentoon, jossa se asettuu lukituskoloon. Huomaa, että pakan täydellinen pysäyttäminen usein vaatii hienosäätöä käyttövivulla jotta löytyy kohta jossa jarru pitää pakan paikallaan. | * Pysäytä kara vetämällä kytkin takaisin keskiasentoon, jossa se asettuu lukituskoloon. Huomaa, että pakan täydellinen pysäyttäminen usein vaatii hienosäätöä käyttövivulla jotta löytyy kohta jossa jarru pitää pakan paikallaan. | ||
* Sammuta moottori punaisesta napista (9) tai hätätapauksessa painikkeesta (10). | * Sammuta moottori punaisesta napista (9) tai hätätapauksessa painikkeesta (10). | ||
| Rivi 190: | Rivi 192: | ||
|| | || | ||
=== Operating the Machine=== | === Operating the Machine=== | ||
See figure 2. | |||
==== Before turning ==== | ==== Before turning ==== | ||
* Switch on the main breaker (1) | * Switch on the main breaker (1) | ||
* Fasten the workpiece to the chuck | * Fasten the workpiece to the chuck (a) | ||
* Slide the chuck protector forward | * Slide the chuck protector forward | ||
* set the chuck speed from the gearbox | * set the chuck speed from the gearbox | ||
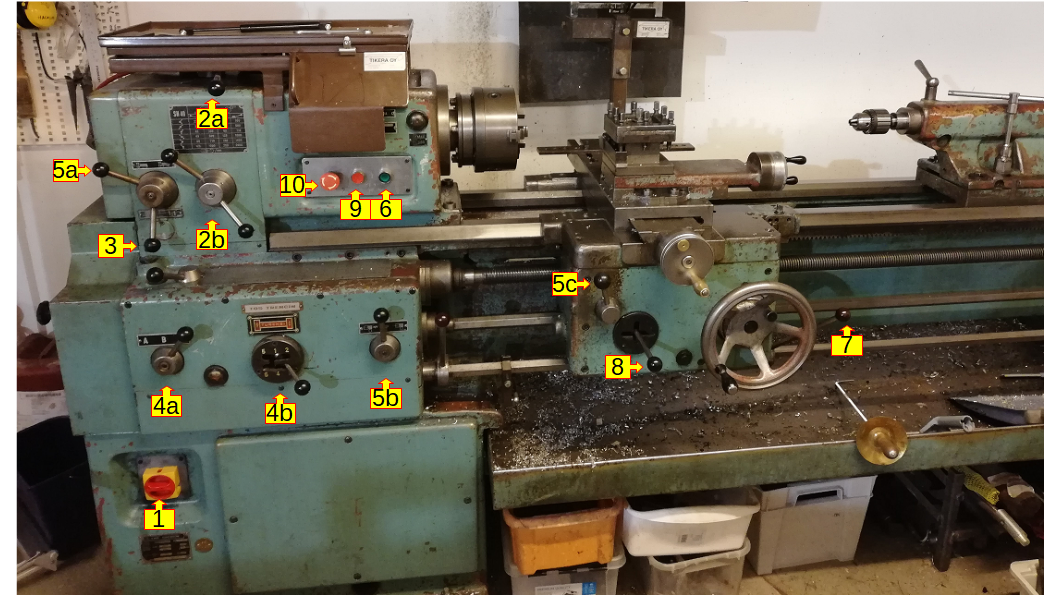
** high vs low gear is selected by lever ( | ** high vs low gear is selected by lever (2a) at the top of the gearbox. Make sure that the lever is either fully left or fully right to engage properly. | ||
** The gear ratio is set by the right hand double levers ( | ** The gear ratio is set by the right hand double levers (2b) | ||
* Set automatic feed speed | * Set automatic feed speed | ||
** select gear ratio ( | ** select gear ratio (3). NOTE: At this time only ratio 1:1 as in the figure, is functional | ||
** select coarse speed ( | ** select coarse speed (4a) | ||
** select fine speed from the gear shift lever ( | ** select fine speed from the gear shift lever (4b) | ||
* ensure that threading mode is not engaged by setting the threading selector lever ( | * ensure that threading mode is not engaged by setting the threading selector lever (5b) in the middle position and check that the thread engagement lever (5c) in the carriage is disengaged position up. | ||
==== Turning ==== | ==== Turning ==== | ||
* To start the motor press green button ( | * To start the motor press green button (6) | ||
* Push operating lever to the right to disengage latch. Then down for forward or up for reverse. DON'T use the lever as a speed control device or you will burn the clutch plates. Always depress fully and return fully. | * Push operating lever (7) to the right to disengage latch. Then down for forward or up for reverse. DON'T use the lever as a speed control device or you will burn the clutch plates. Always depress fully and return fully. | ||
* Do the turning | * Do the turning either by manually operating the handwheels or by using machine feed lever (8). When machine feeding '''TAKE CARE NOT TO COLLIDE THE CARRIAGE WITH THE ROTATING CHUCK''' or anything else either. The lathe will not guard against anything so it is your responsibility to do so - don't sleep at the wheel! Also note that the machine feed lever will take some force to operate, so familiarize with it before going into tight places. | ||
* Stop chuck by returning the lever to middle position where it latches to the locking notch. Note that to completely stop the chuck you may need to fiddle with the operating lever | * Stop chuck by returning the lever (7) to middle position where it latches to the locking notch. Note that to completely stop the chuck you may need to fiddle with the operating lever a bit to find the point where the clutches are open and the brake engages. | ||
* Press the red button to stop the drive motor. | * Press the red button (9)to stop the drive motor, or in an emergency, button (10). | ||
==== Finishing working ==== | ==== Finishing working ==== | ||
Versio 16. lokakuuta 2019 kello 09.54
TOS SN40 -sorviVuonna 2016 hankittu legendaarinen tsekkiläinen TOS SN40 -sorvi.
Samoin kuin Lotta-jyrsin tämä toistaiseksi erisnimeä vailla oleva sorvi on niitä kaluja joiden käyttöön vaaditaan perehtymistä ja näyttöä asioiden hallinnasta. |
TOS SN40 latheIn 2016 we acquired a legendary Czech TOS SN40 lathe.
Same as Lotta mill this so far unnamed lathe is one of the tools that require familiarization and demonstartion of know-how to operate it. |
TurvallisuusYleisesti: koneistuksessa tulee noudattaa aina yhtä ja määrättyä prioriteettijärjestystä:
Onnettomuudet sorvin kanssa työskennellessä tapahtuvat yleensä siten, että:
( Kopioitu täältä: https://discourse.hacklab.fi/t/helsingin-labille-jareaa-tyostokalustoa/475/11 23.3.2018)
|
SafetyIn general, when operating machinery there is a definitive order of priorities:
Accidents in lathe operation are usually caused by one or more of the following:
|
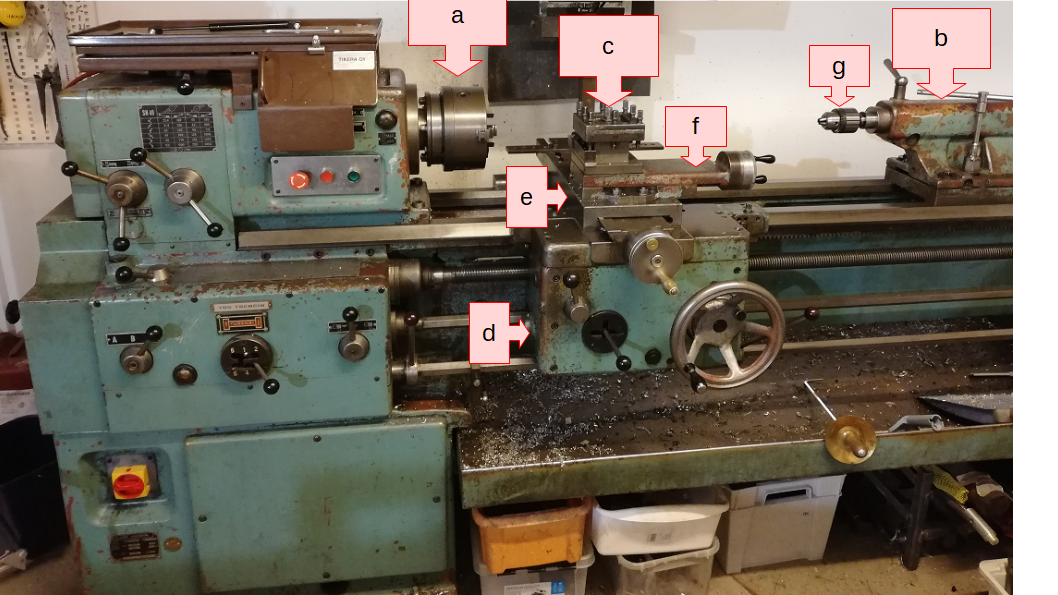
Kuva 1: Sorvin osat
Figure 1: Parts of the lathe
Sorvin osatKts Kuva 1. a: Pakka johon työkappale kiinnitetään. Noudata varovaisuutta ja hyviä työtapoja jottei työkappale muutu ammukseksi huonon kiinnityksen takia! Sorviin löytyy kuvassa näkyvä kolmileukapakka sekä haastavampiin töihin iso nelileukapakka. Pakka kiinnittyy sen takana näkyvillä 4:llä pultilla. Pakkaa vaihtaessa suojaa johteet ja varaudu, että nelileukapakka on painava. b: Kärkipylkkä joka liukuu johteiden päällä ja voidaan lukita paikalleen. Käytetään työkappaleen tukemiseen kiinteillä tai pyörivillä kärjillä, sekä keskiöreikien poraamiseen. Kärkipylkässä on veivipyörällä liikkuva ja lukittava pinoli jolla kärjen tukeminen tai poraus suoritetaan. c: Työkalun kiinnitystorni johon varsinainen sorvausterä kiinnitetään. Kuvassa näkyy alkuperäinen malli, se korvautuu Multifix-pikakiinnikkeellä. d: Pitkittäinen teräkelkka e: poikitainen teräkelkka f: huippukelkka eli kompoundi g: Kärkipylkän kärki (tai kuvassa keskiöreiän porapakka) |
Parts of the lathe
See Figure 1.
a: The chuck where you attach the workpiece. Be careful and observe proper work methods to prevent the workpiece from becoming a projectile due to incompetent fixing! The lathe has the 3 jaw chuck visible in the figure as well as a 4 jaw chuck for more demanding jobs. The chuck is fixed with the 4 bolts visible in Fig 1. When switching chucks do protect the ways and take note that the 4 jaw chuck is heavy.
b: Tail stock that slides on the ways and can be locked in place. It is used to support the workpiece with rotating or stationary centers, and for drilling the center holes. The tail stock has a hand wheel operated quill to facilitate drilling and the quill can be locked to fix the center supporting the workpiece.
c: Tool post for fixing the actual cutting tools. The figure shows the original 4-way tool post which will be replaced by a Multifix quick change tool post.
d: The longitudinal slide
e: The cross-slide
f: Top slide or compound
g: tail stock center or, in this picture, the drill chuck for center drilling
Kuva 2: Sorvin käyttökytkimet ja -vivut
Figure 2: Operating switches and levers of the lathe
Koneen KäyttöKts Kuva 2.
Aloitus
Työstö
Lopetus
|
Operating the MachineSee figure 2.
Before turning
Turning
Finishing working
|
Sallitut materiaalit
|
Permitted materials
|

